Timestamp #82: Pyramids of Mars

Doctor Who: Pyramids of Mars
(4 episodes, s13e09-e12, 1975)

Timestamp 082 Pyramids of Mars


They’re finally back to London, but it’s not really the one Sarah Jane wants.

Professor Scarman is excavating a pyramid which contains what he calls the perfect tomb. There is an Eye of Horus on the door to the inner chamber, which scares away his assistants, but the professor shows no fear as he opens the door… and gets blasted by a ray of green light.

Change scenes to our heroes and the TARDIS travelling through space-time. Sarah Jane gleefully shows off a dress she found in the wardrobe, which a pensive Doctor offhandedly remarks that it belonged to “Vicki” or “Victoria”. That’s either Victoria Waterfield or Vicki Pallister. When Sarah Jane presses the matter, the Doctor explains that he no longer wants to chase after the Brigadier’s whims, and he doesn’t feel quite at home on Earth. His maudlin musings are broken when the TARDIS jolts violently and is redirected to the priory – Professor Scarman’s family home – that existed on the site where UNIT HQ was eventually founded. During the turbulence, Sarah Jane sees an Egyptian jackal face that rapidly disappears.

The priory is occupied by Ibrahim Namin, a mysterious Egyptian gentleman, who is confronted by Dr. Warlock, a friend of the professor who was zapped in the opening scenes. Namin’s butler discovers the Doctor and Sarah Jane, believing that they are agents of Dr. Warlock, and warns them against Namin. As the travelers depart, a sarcophagus opens on its own.

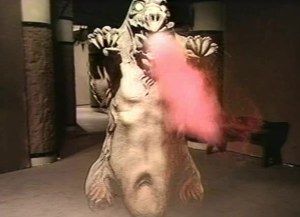
Warlock and Namin are engaged in a heated argument when the butler screams. They rush to the scene and find him strangled, and as Namin nearly kills Warlock with a gun, the Doctor intervenes and saves Warlock before disappearing again. Namin opens the sarcophagus and awakens the mummy within using a special decoder ring. The mummy and Namin pursue the Doctor, Sarah Jane, and a critically wounded Warlock, but are called off as a blast of organ music echoes through the forest. The travelers are found by Laurence Scarman, the professor’s brother, and they hide at his hunting lodge.

The year is 1911 and Scarman has developed a Marconiscope, a predecessor to the radio telescope, which can intercept signals from space. As they switch it on, they receive a signal from Mars that overloads Scarman’s device. The Doctor decodes it: “Beware Sutekh.”

Okay, so we’re talking about Mars. Are the mummies the Ice Warriors?

As the team decides to investigate further, the Doctor claims, “I never carry firearms.” Uh, yes you do. You shot people in Planet of Evil and Day of the Daleks, and you also have a favorite collection.

Anyway, the Doctor and the humans return to the priory as Namin summons a servant of Sutekh through a special sarcophagus carrying a lodestone. Alas, it’s not the Ice Warriors, but it kills Namin as the mighty Sutekh needs no other servants. The servant then morphs into the professor and takes the mummies to set his plan in motion. The Doctor investigates the lodestone and explains that Sutekh is the last of the Osirans. He accidently activates the spacetime tunnel and is nearly drawn through it until he disrupts it and falls unconscious. Sarah Jane and Laurence hide away in a priest hole.

A non sequitur (and likely redshirt) poacher runs into the deflection field set up around the estate by the Sutekh. Professor Scarman, while searching for his brother, finds Warlock and learns about the Doctor. Scarman orders a mummy to kill Warlock. The poacher runs from the death screams and seeks out Laurence. The Doctor decides that his can stop Sutekh by blocking his transmissions to Earth, but he needs Namin’s ring to isolate the frequency. On cue, the professor arrives and almost finds the travelers until the poacher arrives and shoots him. The professor sets the mummies loose on him. True to form, the redshirt’s gonna die.

The travelers locate Namin’s corpse and retrieve the ring, then hide in the TARDIS. The Doctor determines that the mummies, who are really robots, are building rockets to free Sutekh from his imprisonment by destroying the force field generator on Mars. Sarah Jane suggests, since the world didn’t end in 1911, that they should just travel forward to 1980 and be done. The Doctor takes her there, revealing a desolate wasteland, and Sarah Jane realizes that they have to stop Sutekh.

They return to 1911 and take refuge in Laurence’s lodge, planning to build a jamming device. As the mummies kill the poacher, Laurence tries to stop them and the mummies overrun the lodge. The mummies destroy the jamming device, but Sarah Jane drives them off with the ring. The team decides to blow up the missile using blasting gelignite, of which the poacher (of course) had a supply. Laurence stays behind to unwrap the robot as Sarah Jane and the Doctor head for the poacher’s hut. En route, they disrupt part of the barrier, which the professor investigates only to find Laurence. Laurence believes that part of his brother still survives, and he nearly breaks through until the Sutekh persona recovers and tortures Laurence for information.

The Doctor and Sarah Jane take the gelignite to the missile, but do not have detonators or fuses. They return to the lodge to find Laurence’s corpse, and they use the wrappings as a disguise to infiltrate the mummies. The disguised Doctor places the gelignite, but when Sarah Jane shoots it with Laurence’s rifle, the explosion is constrained by Sutekh’s mental power. The Doctor determines that the only way to stop him is to go to Mars and distract him. As the Doctor arrives through the spacetime tunnel, he is stunned by Sutekh, and the action causes the destruction of the rocket.

Sutekh interrogates the Doctor and discovers who he is, and he offers an alliance that the Doctor rejects. Scarman calls and reports that they have captured Sarah Jane, and Sutekh orders her death until the Doctor protests. Sutekh reads the Doctor’s mind and learns of the TARDIS, then transports the key to Scarman. The Doctor saves his life by claiming that the TARDIS controls are isomorphic and will only responds to his touch. He claims allegiance to Sutekh and is supposedly placed under the alien’s command, then returns and pilots the TARDIS to the pyramid so the professor can override the restraining field. The professor enters the chamber and the mummies try to kill the Doctor after he is no longer needed, but that releases Sutekh’s hold on him. He survives due to a respiratory bypass system. It’s convenient, but it’s also science fiction.

The path to the Eye of Horus, the source of the restraining field, is blocked by several logic puzzles which are very reminiscent to a previous story. The professor has Sutekh’s knowledge to help, but the Doctor and Sarah Jane are slower. At one point, Sarah Jane is trapped and the Doctor must face a Knights and Knaves-style challenge: There are two buttons (one is freedom, one is instant death), and the answer lies with two robots (one always lies, one always tells the truth). He successfully answers the riddle, but they are too late since the professor has already destroyed the Eye.

The Doctor realizes that the Time Factor can still save them since the transmission takes two minutes to move from Mars to Earth, and he rushes with Sarah Jane back to the TARDIS and 1911. Using a piece of the TARDIS console, he blocks the spacetime tunnel and traps Sutekh inside, propelling the Osiran forward into the far future until he dies of old age. The sarcophagus explodes, burning the priory to the ground and paving the way for UNIT’s arrival in the future. The Doctor muses about his involvement in the great London fire of 1666, and with that, the pair move on to their next adventure.

Maybe they’ll find London this time?

This was a fun adventure with plenty of twists and turns. It was very engaging. The villain seemed pretty standard until he actually got proactive about the Doctor and tried to kill him, and that small character development pushed it over the top for me. I mean, this villain actually wins until the Doctor stops him at (literally) the very last second.

Looking back, the body count is high in this one. Everyone the Doctor meets is dead at the end. I’d hate to be the CSI lead trying to put this one together.

After reading more about this one, this story also adds to the so-called UNIT Dating Controversy, which isn’t a sticking point on my end yet. That will come up in about seven seasons (or about a year in Timestamps time) with Mawdryn Undead, and, as with most continuity problems in Doctor Who, I’m just going to consider it timey-wimey-wibbly-wobbly and move on.

This one ended up as a high four, and I’ll round up.


Rating: 5/5 – “Fantastic!”


UP NEXT – Doctor Who: The Android Invasion


The Timestamps Project is an adventure through the televised universe of Doctor Who, story by story, from the beginning of the franchise. For more reviews like this one, please visit the project’s page at Creative Criticality.


Timestamp #81: Planet of Evil

Doctor Who: Planet of Evil
(4 episodes, s13e05-e08, 1975)

Timestamp 081 Planet of Evil


This is not London.

On a dark and misty planet in the year 37166, a mining team hits a seventy percent pure vein as another on their team marks another grave in an already crowded graveyard. Professor Sorensen tells his assistant that the planet “knows” and is conspiring against them, but he refuses to leave the vein of ore since the last one inexplicably vanished after their colleague died. The younger spacer leaves the professor and returns to base, but just like Braun (the man who marked the grave), he is vaporized.

Well, that’s a dark start.

I do love the detail in the planet set, though. It beats the socks off of anything from the original Star Trek.

Meanwhile, in the TARDIS Control Room – We haven’t seen that in a while, and it’s the first time for the Fourth Doctor. – our heroes get a distress call and materialize on the evil planet. Sarah Jane is enthralled by something odd, and after she shakes it off, they find the mummified remains of Braun. So, he disappeared at death, but then reappears as a desiccated corpse?

As they investigate the base, a new starship arrives in orbit of the planet, which is now established as Zeta Minor. The ship barely has enough fuel to return home, but Commander Salamar decides to investigate the planet and find the professor’s party. There’s not enough power for a scan, but they transmat down regardless.

The Doctor works on restoring the base’s power while Sarah Jane volunteers to go back to the TARDIS and retrieve the spectromixer, which will determine where they are. Sarah Jane returns to the TARDIS just as the starship’s landing party arrives, and they lock the TARDIS doors with a clamp and transmat it up to the starship. They then encounter the professor and display terrible trigger discipline and muzzle control during their discussion. Seriously, he keeps his weapon pointed at the professor the entire time with his finger on the trigger.

The professor takes the landing party to the base where they all encounter the Doctor, and the spacers take the Time Lord captive as they investigate the strange happenings. Back in the TARDIS, Sarah Jane tries the doors again and finds herself on the starship. She is taken prisoner and interrogated, and the ship commander is skeptical of her story since Zeta Minor is so remote. Salamar decides to land the ship and continue the investigation. The professor explains that the killings started soon after the team arrived and they mostly came at night (mostly). A paranoid Salamar decides that the Doctor and Sarah Jane are to blame, and orders their execution. Luckily, they escape through a window, but they encounter a strange neon semi-transparent creature.

A ship’s sentry tries to shoot the creature, but it deflects the shots and dematerializes the man. A desiccated corpse appears in his place and the creature vanishes. Sarah Jane explains that this is the strange feeling that overwhelmed her before, and the Doctor has a bad feeling about this. The ship’s crew discover that the Doctor and Sarah Jane have escaped and sound the alarm. The travelers run, and the crew open fire and provide their best stormtrooper impersonation by missing every shot.

The commander sends a drone to search for the fugitives. Their analysis of the corpse shows complete dehydration, almost like freeze-drying. Like that astronaut ice cream they sell at Kennedy Space Center, and probably just as tasty. The professor wants to leave since his mission – to find a new source of energy to replace their dying sun – is complete. The commander says that his new mission – to eliminate hostile alien forces – takes precedence. What is he, a Dalek?

The Doctor and Sarah Jane discover a pool of liquid that doesn’t reflect light. The drone finds them, and crewmen arrive to apprehend them. The crewmen roughly search the travelers, and one falls into the pool. There is no splash, and he continues to fall as if the pool were really a bottomless pit.

Sorenson loads his samples as the travelers are returned to the ship and interrogated. The Doctor explains that the planet is the boundary between the universes of matter and anti-matter. By coming to the planet, the boundary has been breached. The travelers are dismissed and rudely shoved into the quarantine chamber with the TARDIS and the ore samples. Sarah Jane suggests leaving, but the Doctor explains that this extends beyond the planet now. It could result in the destruction of the universe.

The Doctor gets all scientific on the ore – I have missed that aspect of the Doctor – and takes a small sample for later. The ship tries to take off, but the engines fail, and the ship is immediately attacked by the neon creature. It picks off guards like redshirts until the commander listens to the Doctor and raises shields. That pushes the creature away and earns him some cachet with the commander and crew. The Doctor explains that the ore is linked to the planet, and that the ship cannot leave without jettisoning the samples and clearly stating an intention to leave without exploiting the planet. The Doctor offers to take that promise to the forces that control the planet, but he must go alone. He goes to the pit (sans scarf) and encounters the neon creature, but the creature pushes him down the hole.

Commander Salamar argues with the professor about leaving the planet, and Sarah Jane goes after the Doctor. As crewmen unload the ore canisters, the professor sneaks into quarantine and sneaks away with a container. The Doctor falls, encounters a large neon creature, and then climbs out of the pit. Sarah Jane finds him, but he is delirious and half-conscious. Salamar see the duo on the drone’s camera feed, and sends crewmen to retrieve them. Meanwhile, the smuggled ore possesses the professor.

The travelers end up in the ship’s sickbay, and as Salamar attempts to lift off, Sarah Jane assures the Doctor – who promised the neon creature as a Time Lord that they would leave the ore behind – that all of the samples are off the ship. The Doctor is assuaged until he remembers that he has some in his toffee tin, and he takes it to the commander. An unfortunate crewman takes the tin to be jettisoned, but he is attacked by the professor. As the ship attempts to reach escape velocity, there is a significant drag, and the Doctor presumes that more antimatter ore is still onboard.

The professor is drinking some kind of fluid to remain in human form. In an attempt to deflect the investigation, he suggests that the travelers are responsible for the deaths, and Salamar demands (at gunpoint) to inspect the TARDIS as a result. As the commander takes the Doctor to quarantine, the professor remains with Sarah Jane. The professor begins to change, sparking that same wave of unease for Sarah Jane, and he leaves sickbay to attack another crewman. Sarah Jane follows the crewman’s screams and discovers yet another desiccated corpse. The same screams distract the commander long enough for the Doctor to sucker punch him and run to the scene. Salamar follows, assumes that the travelers killed the crewman, and shoots the Doctor point blank. The travelers are taken to the ejection chambers – a futuristic walking of the plank – but they are saved by an attack on the bridge.

The professor is trying to maintain control with his serum, but he spills it, leaving no way to stop his transformation. Meanwhile, Salamar is relieved of command by Vishinsky, a senior crewmember who disagrees with the commander’s assessment of the travelers. Sarah Jane explains the strange sensations around the antimatter to the Doctor, and she rushes to the bridge and recommends closing all of the hatches in the passageways to slow Sorensen’s progress. The Doctor breaks into Sorensen’s quarters and finds the antimatter. Sorensen finds him, but the Doctor holds the professor back and explains that the serum has only facilitated the mutation. Sorensen realizes that he must remove the antimatter from the ship.

Meanwhile, Salamar takes the ship’s neutron accelerator and plans to hunt Sorensen with the deadly radiation. After Salamar kills a crewman who tries to stop him, Vishinsky lets the former commander go. Sorensen goes to the ejector room and attempts to eject himself and the sample, but he transforms before he can throw the lever. Vishinsky informs the Doctor of Salamar’s plan, and the Doctor goes to stop him. Salamar finds Sorensen in the ejector room and uses the accelerator, but Sorensen drains him and uses the accelerator’s radiation to increase strength and multiply. The creatures pass through the hatches and kill the crew as the Doctor reaches the bridge. He takes a pistol – noted – and the remaining ore and sets off to find the original Sorensen. The Doctor shoots him – also noted – and drags him into the TARDIS and restrains him, then sets a course for the planet’s surface.

The TARDIS lands at the pit, and the Doctor and Sorensen struggle on the edge. Sorensen falls in, and the Doctor throws the remaining ore in after him. The creatures on the ship vanish, and the ship stops it’s descent toward the planet. Since the Doctor kept his word, a fully human Sorensen is returned to the normal universe, and they return to the ship in the TARDIS. The professor is still returning to his original self and is highly suggestible, so the Doctor plants the idea of using planetary kinetics as an energy source. The travelers then depart for their appointment in London.

This is the standard creature feature with some added twists like the anti-matter universe, a strong environmental message, and the super-guardians of the planet’s balance. I love the detailed planet sets, and enjoyed seeing a more meaty role for the secondary characters as well.

I’m eager to see how the show reconciles the Doctor’s use of firearms in later stories. Part of me holds to the mythos that the Doctor abhors their presence, kind of like MacGyver, and using one is a breach of his character. Day of the Daleks is a good example. The counter-point, as long-time reader Nathan mentioned in a discussion on Facebook, is that the Doctor may be pragmatic enough to realize that firearms are sometimes the lesser of two evils, but always tries to find a better way. Either way, I’m looking forward to how the classic series handles this.

All in all, this was a fun and entertaining story.


Rating: 4/5 – “Would you care for a jelly baby?”


UP NEXT – Doctor Who: Pyramids of Mars


The Timestamps Project is an adventure through the televised universe of Doctor Who, story by story, from the beginning of the franchise. For more reviews like this one, please visit the project’s page at Creative Criticality.


Timestamp #80: Terror of the Zygons

Doctor Who: Terror of the Zygons
(4 episodes, s13e01-e04, 1975)

Timestamp 080 Terror of the Zygons


A peaceful looking oil rig collapses into the ocean after a high-pitched chirping echoes throughout the structure. Welcome to Season 13 and the debut of the Zygons.

After receiving the emergency call from the Brigadier, the Doctor and his companions are back on Earth and walking through the countryside. The Doctor has embraced the Scottish theme of this story with a (unnamed) Tartan scarf and matching Tam O’Shanter hat, while his companions have adopted the typical hat and scarf. They hitch a ride to town with the Duke of Forgill, a local landowner who is upset about Hibernian Oil’s employees trespassing on his land, and meet up with the Brigadier and his Clan Stewart kilt.

You know, I’ve kind of missed him.

The Doctor is upset that he has been called back for a simple oil problem, hardly an emergency in his book, but agrees to help nonetheless. Harry goes to examine the injured rig crew in sickbay, Sarah Jane goes to interview the locals, and the Doctor joins the Brigadier to investigate the oil company. As Sarah Jane interviews Angus, the inn’s landlord, a Zygon eavesdrops on their conversation through an unknown bug. Angus thinks the Tulloch Moor is haunted, but Sarah Jane is not convinced.

While this is their first appearance in the franchise, I have seen the Zygons before in the new series. They really haven’t changed much over the years.

A survivor named Munro stumbles out of the ocean and Harry finds him. Caber, the Duke’s right-hand man, inexplicably shoots Munro and grazes Harry. The Doctor and Sarah Jane visit Harry in sickbay wher the Brigadier informs them of another oil rig collapse — the Zygons summoned a creature from the deep to destroy it — and the Doctor accompanies him as Sarah Jane tends to Harry. The Doctor examines part of the rig’s wreckage and discovers the imprint of a giant tooth.

Sister Lamont, the nurse who is attending to Harry is creepy. At first I thought she was a Ratched, but instead she’s a Zygon who attacks both companions. When the Doctor (who was on the phone with Sarah Jane when the Zygon struck) arrives the hospital, they companions are missing. The Doctor finds Sarah Jane in a decompression chamber and is trapped inside when he attempts to rescue her. He hypnotizes Sarah Jane to slow her breathing, then places himself into a trance as well. Meanwhile, Harry is taken to the Zygon ship, which is deep under the ocean. They crashed on Earth centuries before and waited for rescue, but their world was destroyed. The creature, a cyborg called a Skarasen, is their weapon and means of survival. If it dies, they die.

The Brigadier and his team are knocked out with poison gas, and the Doctor and Sarah Jane are rescued by Warrant Officer Benton. The trance was something he learned from a Tibetan monk. They return to the inn and discover that the same nerve gas that affected the Brigadier’s team also incapacitated the entire village. The Doctor receives a signal device, which controls the Skarasen, and the Zygons are upset by the turn of events. The take Harry to the chamber to become the pattern for one of the Zygon invaders.

The Brigadier’s team recovers and discovers one of the UNIT patrol soldiers who was killed by the creature. The Doctor goes to investigate and leaves Sarah Jane at the inn, much to the Zygon’s delight. Harry’s doppelgänger arrives, steals the device, and runs, leading Sarah Jane and some troops on a chase. She finds him in a barn, and he attacks her, but he falls on his pitchfork and reverts into Zygon form before dying. The Zygons disperse the corpse before Sarah Jane brings UNIT to see it.

Sarah Jane deduces that the Zygons are spying on UNIT, and the Zygons send the Skarasen to destroy them. The Doctor lures the beast away in a truck as the Brigadier tracks the signal’s origin. The Skarasen chases the Doctor, who has to run after the truck runs out of fuel and the tracker attaches itself to his hand. The Brigadier traces the signal to Loch Ness.

Ah, of course: Nessie is an alien cyborg.

Harry bursts into the control room and starts mashing buttons on the console, which conveniently results in the tracker falling off the Doctor’s hand. In a terrible special effects sequence, the Skarasen crushes the tracker, which stops the signal and makes the Zygons assume that the Doctor is dead. Meanwhile, Benton is searching the inn for bugs, and we figure out that the Duke’s prized deer head trophy is the transmitter.

After finding out where the signal came from, the Doctor asks Sarah Jane and the Brigadier to take him to the Duke’s castle. The Duke does not believe their tale, and he refuses to allow UNIT to use depth charges in the loch. Back at the inn, Angus discovers the deer head transmitter, and the nurse goes full Zygon on him and removes the eye. Benton and his team give chase into the woods, shooting at the Zygon as it flees, and report to the Brigadier that they have it cornered. The Doctor and the Brigadier leave Sarah Jane to investigate the Duke’s library as they rendezvous with Benton. The Zygon resumes its form as Sister Lamont, knocks out a UNIT soldier, and escapes. The Doctor discovers the missing eye and concludes that the Duke is a Zygon agent.

At the Duke’s castle, Sarah Jane discovers a hidden passageway behind the bookshelf and follows it straight to the Zygon ship. Shortly afterward, the Duke finds out about her intrusion. He and Caber help the injured Sister Lamont doppelgänger back to the ship, and the Duke orders Caber to find and destroy Sarah Jane.

Sarah Jane rescues Harry and they return to the Doctor and the Brigadier. The Doctor heads to the ship but is intercepted by Zygons and held hostage. The Zygons tell the companions that the oil rigs were only the prelude to the “big event”. UNIT begins shelling the loch and the Zygon ship surfaces and flies away. The Brigadier prepares to follow, but the companions suggest searching the castle for clues. Sarah Jane discovers that the Duke is the President of the Scottish Energy Commission, but Harry dismisses the information and they join the Brigadier for a trip back to London.

The Zygon ship lands at a disused quarry, but UNIT cannot track it due to a jamming signal. Broton, the Zygon leader and Duke doppelgänger, tells the Doctor that a refugee fleet is on its way to Earth, but in the intervening centuries, the planet must be rebuilt to suit them. After Broton leaves, the Doctor rigs some of the technology in his cell, which electrocutes him but broadcasts a tracking signal to UNIT. The Zygons leave the Doctor for dead, but he comes to, infiltrates the body print center, and frees the humans being held there. He then blows up the ship using the self-destruct mechanism, which is a bit bloodthirsty, but he did try negotiating first.

Broton, having left moments before, goes to place a tracker on the target so Skarasen can destroy it. The Brigadier and the companions figure out that the International Energy Conference is the target, and that the Broton can get in using the Duke’s credentials. They all reconvene there, and the Doctor confronts the Zygon. Sarah Jane summons the Brigadier, who shoots and kills Broton.

Hey, firearms finally worked!

The Doctor takes the tracker and rushes outside where he feeds it to the Skarasen. The creature returns to the river and swims back to Loch Ness, and thus we have the legend. The team returns to the TARDIS near the loch, and the Doctor offers them all a ride home, but only Sarah Jane joins him with one proviso: They are to return straight to London.

Yeah, right.

We finally say goodbye to Harry. I can’t say that I’ll miss him, but I can say that he’ll join the ranks of Steven Taylor as one of my least favorite companions.

As far as the story goes, it’s lackluster and all over the map. It’s an unfortunate case of style over substance: The Zygons and their ship were well done for the era, and the story plays on the prevalent oil-politics in the news, but it also heavily leans on Scottish stereotypes to drive the story, and I had a hard time getting around them. From the very first line haggis-laden line of the first episode, the story jumps from kilts to beards to bagpipes to second sight to the Loch Ness Monster, and it finishes on a joke about stingy Scotsmen.

Don’t get me wrong: It’s nice to visit Scotland again, but this doesn’t come close to the spirit of Jamie McCrimmon. It was a fun, but ultimately routine and forgettable romp.


Rating: 3/5 – “Reverse the polarity of the neutron flow.”


UP NEXT – Doctor Who: Planet of Evil


The Timestamps Project is an adventure through the televised universe of Doctor Who, story by story, from the beginning of the franchise. For more reviews like this one, please visit the project’s page at Creative Criticality.


Timestamp #79: Revenge of the Cybermen

Doctor Who: Revenge of the Cybermen
(4 episodes, s12e17-e20, 1975)

Timestamp 079 Revenge of the Cybermen


It has been a long time since we encountered the Cybermen. That break ends as the Time Ring delivers our heroes back to the Nerva Beacon, just not exactly as they left it a few weeks ago.

As they investigate the station, they discover several dead bodies, some of which are obviously mannequins. Harry estimates that they have been dead for a couple of weeks. In that time, the station has been ravaged by a plague and is under quarantine, and is being protected by the few remaining survivors. Those survivors are also trying to fulfill the station’s mission as a warning buoy for a nearby hazard to navigation: The Voga asteroid.

The Doctor determines that this is the Nerva Beacon before it became the Ark in Space as a cybermat creeps by undetected. The team unlock a door using a screwdriver (but not the sonic one) and reach the control room just after the cybermat kills operator Warner and Professor Kellman, a planetary surveyor, alters the communication logs. Those logs hold evidence that the asteroid is inhabited, which Kellman claims isn’t true. The Doctor and his companions are captured by the station’s crew, and they examine Warner while being under suspicion of bringing the plague to Nerva. As the Doctor investigates the virus and Voga, Kellman spies on them with a makeshift receiver and then transmits a message to a waiting Cyberman spacecraft.

The Vogans, who share a common seal with the future Rassilon, are debating their situation. The one called Vorus is in control of the mines, and they assume that the reason they haven’t been contacted by their agent is that the Cybermen are monitoring their communications. The Cybermen were last heard from centuries before. They vanished right after attacking Voga near the end of the Cyber War.

Following his suspicions, the Doctor investigates Kellman’s quarters and finds gold, which Voga has in abundance. Kellman returns and the Doctor hides under the bed, but Kellman sets a trap that electrifies the deck plating and locks the Doctor in the room. Sarah Jane reviews the station’s logs and is attacked by the cybermat. The Doctor escapes Kellman’s quarters and rushes to Sarah Jane’s aid after killing the cybermat, but she’s already been bitten. The Doctor rushes her to the transmat, which will filter the poison from her blood, but the device has been sabotaged. Kellman overhears the conversation and the plans to arrest him, so he arms himself.

The Doctor jury-rigs the transmat, and it beams Sarah Jane and Harry to the asteroid, saving Sarah Jane’s life. As Harry finds the abundance of gold, the Vogans capture the travelers. Meanwhile, the station crew captures Kellman. The crew and the Doctor interrogate Kellman as the Cyberman ship approaches. The Cyberman Leader is identified by a black headpiece. Gold can kill the Cybermen by suffocation, explaining why they want to destroy Voga. The crew threaten Kellman with a cybermat using a control box they found in his quarters, coercing him to give up the transmat control drive.

The Vogans prep a device called the Sky Striker for use against the Cybermen. Councillor Tyrum, a leader of the Vogans, has dispatched troops to take over the mines and stop Vorus’s plans to re-emerge on the galactic market. Tyrum fears that they will be attacked again. Vorus plans to kill the humans and hide the Sky Striker from Tyrum. Harry and Sarah Jane escape just as the execution team arrives, and Tyrum’s militia arrives to force the Guardians to stand down.

You know, the Vogan politics are a bit of a drag on the story at this point.

The Doctor repairs the transmat but cannot locate his companions. The Cyberman ship docks with Nerva and board the station. The crew tries to repel them, but are struck down by cannons in the heads of the intruders. They also take down the Doctor. They are all merely stunned, and Kellman tries to find information on the Doctor but only comes up with an apple core and jelly babies. Meanwhile on Voga, Sarah Jane and Harry are taken before Tyrum and explain themselves. The mention of the cybermat sparks Tyrum’s interest in confronting Vorus.

As Kellman outlines his plan for the Leader, it is explained that his reward for destroying Voga is rule over the solar system. Kellman is sent to Voga to verify that the transmat is functional, and he is taken captive by the Vogans. The Doctor and humans, with a Cyberman escort, are to take bombs to the mines and set them, after which they will have fourteen minutes to escape. They cannot be defused, and they will kill the carriers if the harness is removed. The Vogans ambush the bomb team, but the Cybermen make short work of them.

Kellman is taken to Tyrum and explains that he was working with Vorus to destroy the Cybermen with the Sky Striker. This will result in the destruction of the Nerva Beacon as well, and the companions plan to warn/rescue the Doctor. Sarah Jane beams up to Nerva and overhears that the Cybermen have lied about the fourteen minute delay.

Kellman and Harry try to intercept the bombs as the Doctor and his team make their way to the center of the asteroid. They meet up as Kellman causes a cave-in the kills him and knocks out the Doctor’s team. They stop Harry from unbuckling the harness, and the Doctor humorously declares that Harry is an imbecile. The team makes a plan to attack the Cybermen while one of them continues on to confuse the trackers on their harnesses. Their plan is foiled by the sheer strength of the Cybermen, but one of the crew unbuckles his harness and destroys the enemies with the suicide switch. As the tracker signal is lost, the Leader orders a manual detonation, and Sarah Jane rushes them. They brush her off and attempt the detonation, but the Doctor has overridden the communications link and disabled the bombs.

Sarah Jane explains to the Cybermen how Kellman betrayed them. The Doctor convinces the Vogans to wait just long enough for him to rescue Sarah Jane. The Cybermen develop an alternative plan to crash Nerva into Voga with bombs and Sarah Jane onboard, and the Doctor frees Sarah Jane and then uses the remote control cybermat to ambush the Cybermen with gold dust.

As the Nerva Beacon races toward Voga, Vorus launches the Sky Striker as he shot by the militiamen. The Doctor and Sarah Jane are captured and are tied up as the remaining Cybermen leave in their ship. The Doctor frees himself and Sarah Jane, reasons with the Vogans on how to change the rocket’s course, and then overrides the gyros to park Nerva on the other side of the Voga asteroid. Just as the station stabilizes, the TARDIS finally arrives to meet the Doctor, and Harry returns to Nerva via transmat. They leave at the summons of the Brigadier who communicated an emergency through the space-time telegraph.

Overall, it was a decent story, but not particularly strong. I liked the Cyberman side of it, but the internal Voga politics dragged on the story. The last two episodes nearly made up for it with the action, but the setup took far too long and was way to choppy and erratic as the writers tried to make the Voga stuff fit.

All in all, I consider it a so-so return that should have been better.


Rating: 3/5 – “Reverse the polarity of the neutron flow.”


UP NEXT – Twelfth Series Summary


The Timestamps Project is an adventure through the televised universe of Doctor Who, story by story, from the beginning of the franchise. For more reviews like this one, please visit the project’s page at Creative Criticality.


Timestamp #78: Genesis of the Daleks

Doctor Who: Genesis of the Daleks
(6 episodes, s12e11-e16, 1975)

Timestamp 078 Genesis of the Daleks


The last story was an experiment in splitting six-part serials into smaller pieces to remove story padding. That two-parter is followed by this six-parter, which would be ironic if not for that fact that it’s one of the most beloved stories in classic Who. When I ask classic fans what the Doctor means to them, this is usually the story they point to.

Because of that, I was really excited to watch this one.

The Doctor and his companions have departed future Earth after defeating the Sontarans, but they don’t arrive as expected on Nerva. Instead, they are on misty planet drowning in a battle that echoes World War II. In short order, the Time Lords arrive and reveal that they redirected the Doctor to Skaro in the distant past. The Doctor is upset about the manipulation, but acquiesces when the Time Lords tell him about his mission: To interfere in the development of the Daleks. They provide him a Time Ring to return to the TARDIS after his mission is complete.

The travelers soon find a warrior, who is soon killed in an artillery barrage, and note the distinct anachronisms in everything around them. They continue on, stumble into a minefield, and eventually discover a large domed city surrounded by trenches. The Doctor theorizes that the anachronisms are due to the battle raging on so long that technology has regressed as resources were depleted. The trench is attacked by chemical gas rockets, and the Doctor and Harry are spirited into a bunker and transported into the city.

The attackers are the Thals, and the Doctor’s captors are the Kaleds, a very Nazi-like organization. The Doctor surprises the Kaled commander, who keeps referring to the Doctor as a “muto”, and takes him captive. The Doctor and Harry return to the wasteland, but Sarah Jane has already recovered and moved on, and the duo are surprised by Security Commander Nyder, who raises the alert in the base. The pair of travelers are soon captured and interrogated by Nyder, who refers to Davros, the greatest scientist of the Kaled people. He also explains that the mutos are Kaleds who have been genetically scarred by the war, and that they are exiled to keep the Kaled race pure.

They are laying this Nazi allegory on thick.

Meanwhile, Sarah Jane is on the surface being pursued by the mutos as night falls. She comes across a weapons test led by Davos, a scarred man with a third eye in a robotic chair. The test is of a Dalek, which isn’t quite autonomous yet. After the test, Davros departs, and Sarah Jane is nearly spotted by the Kaleds before being abducted by the Mutos. The Mutos fight over whether or not to kill Sarah Jane since she is a “norm.” They are interrupted by a Thal patrol who take Sarah Jane and the Muto Sevrin for physical labor.

Back in the bunker, the Doctor and Harry are delivered to the holding area where they are scanned. The scanner detects the time ring, which is physically removed under the Doctor’s protest. As scientific examiner Ronson examines the Doctor and Harry, he discovers that they are aliens to Skaro. That discussion is interrupted by Davros, who demonstrates the Dalek – known at this point as a Mark III Travel Machine – for the assembled scientists. When shifted to automatic mode, it detects the Doctor and Harry and almost exterminates them until Ronson interrupts the experiment. A furious Davros gives Ronson the night to investigate the travelers, but it must be done from their holding cells.

The Doctor discovers from his interrogation that the Kaled scientists were formed as an elite group for research, but over the years they became more powerful and influential. Ronson notes that the Doctor used the term “Dalek” well before Davros called the machine by the same name, and the Doctor reveals that he is from the future. Ronson discloses his fear that the Kaleds are becoming more evil and immoral, including experiments by Davros to create the final form the Kaled mutation. The travel machine, the Dalek, is the vehicle to house and propel that being. Ronson believes that if the government knew about any of this, they would shut down the entire program, and engineers an escape into the cave system surrounding the bunker.

The Thals are using the slave labor to pack a rocket with distronic explosives, but they are not provided any shielding or protection, so the workers will die from exposure to the material. After the first shift of rocket loading, Sarah Jane attempts to spark a rebellion and plots escape through the top of the dome. She distracts the guard and the prisoners flee. The guard sounds the alarm as the prisoners climb, and the Thals open fire, killing several of the prisoners. Sarah Jane loses her grip and falls, landing on a lower platform unharmed. Sevrin helps her recover and pushes her onward, and they nearly escape before the Thals catch up to them.

The Doctor and Harry reach the city tell the Kaled Council about the Daleks and the future. The Council won’t shut down the bunker entirely, but decide to inspect and audit the programs. As the Council adjourns, the Doctor and Harry learn about Sarah Jane’s whereabouts and set out after her. Davros discovers that the Councilors are meeting in secret and that the travelers were in attendance. He agrees to the investigation, but in secret begins his plan for complete extermination of the Kaled people by arming the Daleks with the mutations.

The Doctor and Harry infiltrate the Thal dome to discover Davros petitioning the Thal Council for peace, claiming that the Kaled Council is not interested in ending the conflict. Davros provides the Thals the means to weaken the Kaled dome and exterminate the Kaled people with their rocket. The Doctor and Harry jump two guards and steal their suits – “Excuse me, can you help me? I’m a spy.” – before rescuing Sarah Jane and the captives. Harry leads them out of the city as the Doctor works to sabotage the rocket. One of the guards triggers an anti-intrusion system and captures the Doctor.

The Doctor wakes up in the Thal dome’s control room with the bombardment of the Kaled dome underway. They launch the rocket as the Kaled scientists watch in dismay, and the Kaled dome is destroyed. Davros calls in the Daleks and orders them to exterminate Ronson before declaring their rise as the ultimate supreme race. The Doctor is freed in the Thal celebration, and the Thals see Davros as a hero of the people. After Davros orders changes to the Daleks that will remove their consciences completely, the Daleks attack the Thal dome and exterminate with prejudice. The Doctor and a Thal woman, Bettan, escape the dome and she decides to raise a rebellion.

A temporal inconsistency: These Daleks don’t require the static tracks like they did in the Hartnell era, which falls after this war’s conclusion. Did something change in the timeline to remove this detail?

The Doctor makes his way to the Kaled bunker to retrieve the time ring, and is attacked by Mutos and saved by Sarah Jane and Harry. Scientists begin to foment a rebellion against the Dalek program, but are interrupted by Nyder and Davros just as the travelers break into the city and are subsequently captured. Davros discusses time travel with the Doctor and demands that he disclose exactly how he defeats the Daleks in the future. When the Doctor refuses, Davros uses the threat of harm to the companions as leverage. I see where the Daleks get their stunning personalities and penchant for temper tantrums. The Doctor yields to Davros and provides a litany of Dalek defeats which are recorded for the future. As they take a break, Davros trusts the tape to Nyder as he sits down to confer with the Doctor. The Doctor tries to persuade Davros to abandon the Dalek project, but Davros is not swayed. Convinced that Davros is insane, the Doctor seizes control of the leader’s chair and threatens to disable it and kill him if he doesn’t shut down the program. He nearly succeeds before Nyder stops him.

Kavell, one of the leading scientists, breaks Sarah Jane and Harry out of the confinement cells. Nyder escapes, and the Doctor warns that Davros knows what Kavell is planning. The travelers set out to retrieve both the time ring and the recording of the future. Meanwhile, the Daleks have destroyed all resistance in the Thal city, and all that remains is Bettan’s rebellion. Inside the bunker, rebellion also breaks out, but Davros surprisingly orders Nyder’s forces to surrender. Davros tells Nyder that this is a ruse, as is the conference to listen to the rebellion’s demands. At that conference, the rebellion demands that the Dalek project be terminated. Davros asks for time to consider the demands, and agrees to the demands on the condition that the military and scientific elite present the demands to a vote before him.

The Doctor discovers plastic explosives and detonators, and plots commit genocide by destroying the Dalek embryos in the incubation room. He enters the chamber to place the charges, and emerges with Dalek tentacles wrapped around his throat. After being freed, he holds the conductors in his hands but cannot detonate the explosives. Does he have the right? Killing them would secure freedom and peace for the future, but the action would make him no better than the Daleks themselves. He pulls the plug on the plan when he hears that Davros is willing to discuss the demands.

That epic moment in the franchise was worth the price of admission alone. Tom Baker sells it with passion.

The travelers attend the discussion, secretly returning the Doctor’s possessions to him. Davros shows his opponents a button that will destroy the entire bunker — seriously, a big red button to destroy everything? — but no one will press it, which Davros sees as an argument in his favor because it shows weakness. Meanwhile, he has been maneuvering the Daleks to assault the rebels, and Bettan’s forces set charges to seal the bunker permanently.

Nyder sneaks out during the vote, and the travelers follow him. In the ensuing altercation, the Doctor drops the time ring, but convinces Nyder to take them to the tape recording. As the travelers destroy the tape, Nyder escapes and locks them in the office. They bring up the camera feed of the vote as the Daleks roll in and kill everyone. The travelers are soon rescued by Sevrin and start running from the Daleks, and the Doctor sends the companions with Sevrin and the rebels while he returns to destroy the incubator chamber. At this point, he’s at his last straw, and it seems that he’s willing to become the villain to save countless lives. His efforts are thwarted by a Dalek who fires on him, but the Dalek rolls over the conductors, completes the circuit, and destroys the chamber and itself.

The Daleks start the assembly line without Davros’s approval, and kill Nyder as he attempts to shut it down. They rebel against Davros, apparently exterminating him as he attempts to destroy the bunker with that big red button. The travelers escape as Bettan’s forces seal the bunker and use the time ring to return to the TARDIS.

This was a really good story, and it earns the admiration that fans bestow on it. On the downside, it is a bit padded and long, but that easily washed out by the quality and performances.

Rating: 4/5 – “Would you care for a jelly baby?”


UP NEXT – Doctor Who: Revenge of the Cybermen


The Timestamps Project is an adventure through the televised universe of Doctor Who, story by story, from the beginning of the franchise. For more reviews like this one, please visit the project’s page at Creative Criticality.


Timestamp #77: The Sontaran Experiment

Doctor Who: The Sontaran Experiment
(2 episodes, s12e09-e10, 1975)

Timestamp 077 The Sontaran Experiment


Before watching this serial, I read up a little on this short story. The TARDIS wiki entry tells the tale: “Script editor Robert Holmes was not a fan of six-part stories, believing that they were padded, so for season twelve, he decided to have one four-part story and one two-part story.”

After some of the reviews on The Timestamps Project, I can attest to that. I respect him for going out on a limb like that.

This one picks up right after The Ark in Space. The Doctor and his companions teleport down to Earth with only a few hiccups, and the Doctor sets to work on fixing the refractor units. The companions venture off to explore as Harry corrects his demeaning banter with Sarah Jane. For now, anyway. Within no time at all, the Doctor is in the crosshairs of a hunter’s rifle, Harry takes a tumble into a disguised trap, and Sarah Jane goes for help.

One of the hunters is chased by a robot, and falls off a cliff. The Doctor goes to help, and the other hunters mistake the Doctor for the perpetrator and stun him into submission as another human in a spacesuit, Roth, watches from the brush. Sarah Jane returns to the refractors and finds only the sonic screwdriver, so she returns to Harry, but he’s no longer there. In the interim, Harry has fled after being attacked. Roth sneaks up behind Sarah Jane and saves her from the robot, and he explains that the trap was set for the robot, who is an agent for an alien in the rocks that is trapping the human explorers and torturing them.

In a twist on that theme, the Doctor is being interrogated by the explorers. It seems that the Nerva Station has become legendary as a lost colony. These explorers are from another colony, GalSec, and being monitored by the alien. There were nine of them on a military expedition, and they were stranded when the alien destroyed their ship. The explorers are serious about the interrogation, but the Doctor is not, and his overall attitude about it is amusing. He’s freed in short order as Roth stages a diversion and Sarah Jane rushes to the Doctor’s rescue. They head back to the hole trap and investigate, and the Doctor jumps into the hole as the robot arrives. The Robot takes Sarah Jane and Roth to the alien, which Harry has just located, and the reveals himself as a Sontaran.

That explains the title.

Sarah Jane is surprised to see the Sontaran since he look just like the one who died in 13th century England. Sure, Sarah Jane, they both look like a potato in armor, but Linx looked more like an undead zombie potato in armor. This Sontaran, Field Major Styre, reveals that he looks the same – no he doesn’t! – but he is not the same because they are a species of clones bred to fight wars. As Sarah Jane ponders this, Roth tries to escape and Styre kills him.

Back at the hole trap, the Doctor climbs out and into the arms of his previous captors, who are subsequently captured by the robot. The Doctor dives back into the hole and finds the tunnel that Harry used. Speaking of, Harry explores the area around the ship, finds a captive, and tends to him. Keeping the story’s title honest, the Sontaran is experimenting on humanity to determine their limits and weaknesses in preparation for an invasion of Earth. After Styre interrogates Sarah Jane, revealing that she should not exist since she was not among the humans on the planet at the time of the catastrophe, he reports his results to his commanders and begins a fear-based experiment on Sarah Jane. Harry locates Sarah Jane, calls her “old girl” again because the old boy never learns, and tries to free her but cannot. After Harry departs, the Doctor arrives, disables the force field, frees Sarah Jane, and confronts the Sontaran. He tries to escape, but the Sontaran shoots him before returning to his ship to deal with the rest of the human explorers.

Harry returns to the unconscious Sarah Jane and Doctor, and in a fit of anger and determination, he nearly strikes the Sontaran before the Doctor stops him. The Doctor was saved by his own contradictory nature – “Never throw anything away,” but remember that “It’s a mistake to clutter your pockets” – and he devises a plan after disabling the robot and listening in on the invasion plans. The Doctor decides to confront Styre in hand-to-hand combat, which will tire the Sontaran and force him to recharge at the ship, which Harry and Sarah Jane will sabotage. The battle is so-so, but the Doctor’s use of the Sontaran’s pride against him is just awesome. As planned, Styre wears himself out, returns to the ship, and melts away as the ship reverses the recharge sequence. The Doctor solves the Sontaran threat with a bluff, and beams himself and the companions away.

To Robert Holmes’s credit, this was a much tighter story than most. On the downside, it was a little too fast-paced for this era and writing staff, and the storytelling shortcuts were obvious. Despite that, I think it was still a good adventure.


Rating: 4/5 – “Would you care for a jelly baby?”


UP NEXT – Doctor Who: Genesis of the Daleks


The Timestamps Project is an adventure through the televised universe of Doctor Who, story by story, from the beginning of the franchise. For more reviews like this one, please visit the project’s page at Creative Criticality.


Timestamp #76: The Ark in Space

Doctor Who: The Ark in Space
(4 episodes, s12e05-e08, 1975)

Timestamp 076 The Ark in Space


After this one started, I realized that I had seen it before as part of the “greatest hits” one-story-per-classic-Doctor series on Netflix. Just like The Aztecs in that same series, it didn’t make a whole lot of sense on my first watch.

How does it fare this time? You’ll find out shortly.

The TARDIS, sporting a different look (maybe?) with the backlit “POLICE BOX” label, arrives on a space station with people hibernating in stasis tubes. Harry Sullivan is shocked after his first trip in the TARDIS, and amusingly, the Doctor checks gravity with a yo-yo. I’ve missed the whimsy so much since Patrick Troughton. As the team investigates the strange station, Sarah Jane is divided from the group and trapped in a room that is losing oxygen. Harry and the Doctor discover her after she’s lost consciousness, but they also fall into the same trap. Just in time, the Doctor discovers that the cables have been chewed through, and he uses his sonic screwdriver to repair the circuit.

As Sarah Jane recovers, the Doctor and Harry are attacked by a security robot and they seek cover under a table. The Doctor tries to distract the robot with his hat and scarf – created for him by that “witty little knitter” Madame Nostradamus – and finally uses his sonic screwdriver to unfasten the table from the deck and move across the room like a turtle to the security panel. They distract the robot and shut it down.

Meanwhile, Sarah Jane is teleported away and processed by the automated system. As Harry and the Doctor look for Sarah Jane, they find a skulking creature that leaves a slime trail. They discover the processing room, which leads the Doctor to conclude that they are in a cryogenic repository and ultimate human library. A literal ark in space.

Hence, the story’s title.

They discover banks upon banks of suspended humans, as well as the slime trail, and this leads Harry to Sarah Jane, who is also in suspended animation. Harry looks for a resuscitation unit and finds a large dead insect. Shortly afterward, one of the humans revives. Her name is Vira, and she is a First Med-tech. She helps to revive Sarah Jane, and then moves to their leader, Noah. His real name is Lazar, but he is named after the myth of the Biblical Ark. They took to the stars after solar flares threatened the Earth, anticipating only 5,000 years in suspension. Evidently, they slept far longer.

The power fails as Noah is being revived, and the Doctor goes to the control room to restore the systems. He investigates the failure in the solar stacks and finds substantial contamination from the grubs. When Noah comes to, he is concerned that the travelers will contaminate their carefully selected gene pool. He tracks the Doctor to the solar stacks after arming himself. He finds the Doctor in the control room and refuses to believe the Time Lord’s story, and he shoots the Doctor.

A note on Harry: He just doesn’t learn. Sarah Jane has asked him not to call her “old girl,” yet he continues to do so. He also calls Vira the same and touches her shoulder when it’s clearly not desired. The Doctor sees something in him, so I’m giving him a chance, but come on, Lieutenant.

Anyway, Vira traces the slime trail in the hibernation chambers to a capsule once occupied by a technician named Dune. On the other side of the station, Noah goes to the solar stacks as Harry and Sarah Jane attend to the Doctor. Noah finds the broken solar stack chamber, and is attacked by the grub. The Doctor comes to and the travelers follow Noah to the solar stacks, but he intercepts them and escorts them back to the hibernation section.

Vira revives a technician name Libri, who reacts strangely to Noah’s presence as though he saw a creature. Noah leaves the captives to Libri, and then orders a shutdown of the station, claiming to be Dune as well as Noah. The Doctor advises Libri to stop Noah, then investigates Dune’s pod and finds evidence that the dead insect embedded larvae in Dune, just like creepy real-world parasitic wasps, which consumed him and absorbed his knowledge. Libri confronts Noah, but Noah disarms and kills him before revealing that he is metamorphosing into the insect. His hand is covered in painted bubble wrap. In a moment of lucidity, Noah fights the alien presence and transfers command to Vira with an order to get back to the planet as soon as possible. He discloses that the aliens are the Wirrn, and that they will absorb the humans.

Another note on Harry: He calls Sarah Jane a chauvinist for feminism. I’m really starting to dislike him. He’s competent, but he’s an ass.

The Doctor and Vira track down Noah, but he’s nearly consumed by the Wirrn. Vira is saddened because she and Noah were pair-bonded for the new Earth. Meanwhile, Harry and Sarah Jane begin to awaken the crew. Vira wants to awaken everyone and send them to Earth, but the Doctor convinces her to delay until he can stop the invasion.

Harry and the Doctor perform an autopsy/necropsy on the insect, and the Doctor tries to download the Queen’s memories into the station computer. When that fails, he downloads the memories directly into his own mind. As that happens, the Wirrn break into the hibernation chamber and kill one of the technicians. Vira orders the remaining men, Harry and Rogin, to be armed, and they drive the Wirrn back into the ventilation ducts.

The Doctor discovers in the Queen’s memories that she was killed by the automatic robot guard, and the Doctor decides to electrify the station’s infrastructure to defeat them. Trapped in the room by the Wirrn, the Doctor uses the transmat to move everyone to the control room, but it fails after only Harry and Rogin are transported since the Wirrn shut down the power systems. The Doctor braves the station to restore power, but encounters a nearly metamorphosed Noah. He is saved by Vira and Sarah Jane, and the Wirrn explain that they are seeking vengeance since human explorers displaced them from their breeding grounds in Andromeda. They plan to absorb all of the knowledge on the Ark become a superpower, but offer sanctuary for people on board if they leave immediately.

The team devises a plan to electrify the station using the transport shuttle, and Sarah Jane volunteers for the most hazardous task: routing the cable through the ventilation ducts. She gets stuck at one point, and the Doctor provokes her into fighting her way free, after which he praises her. I enjoyed that clever moment.

With the normal routes to the hibernation chamber cut off, the Wirrn attempt alternate entries. The Noah-Wirrn negotiates with the Doctor by holding the oxygen supply hostage. The Doctor appeals to his remaining humanity, but fails. The Wirrn attempt to take the shuttle bridge through the cargo bay, and the Doctor has the team return to the ark and the shuttle take off automatically. The Doctor’s attempt to sacrifice himself to release the locks is thwarted by Rogin who bravely takes his place. The swarm is ejected from the station in the shuttle, and Noah-Wirrn deliberately destroys the shuttle in his last gasp of humanity.

With the shuttle destroyed, the transmat is the only way to get the humans back to Earth, but the Doctor notices that the system is faulted. He, Sarah Jane, and Harry beam down to Earth to fix them as Vira begins awakening the ark.

This one was a fun romp with the typical monster-of-the-week and cliffhanger ending of the early years. Even with Harry’s bone-headedness, it was still enjoyable, much better on this go-round with some franchise context, and a good full intro to this Doctor.

Rating: 4/5 – “Would you care for a jelly baby?”


UP NEXT – Doctor Who: The Sontaran Experiment


The Timestamps Project is an adventure through the televised universe of Doctor Who, story by story, from the beginning of the franchise. For more reviews like this one, please visit the project’s page at Creative Criticality.


Timestamp #75: Robot

Doctor Who: Robot
(4 episodes, s12e01-e04, 1974-75)

Timestamp 075 Robot


It’s never easy changing Doctors, but I think I’m going to like this one.

Things start out with another new title sequence, which is great, but I kind of miss the warp stars. The story itself kicks off with a delirious Doctor who mentions previous adventures as Lieutenant Harry Sullivan, UNIT’s staff physician, takes the Time Lord to the infirmary. Congratulations are also in order as Benton’s been promoted to Warrant Officer. That’s one big wetting-down party.

As the heroes get sorted out, a robot infiltrates a military facility. It kills a dog, so we know it’s bad, and steals top secret disintegrator gun plans. Back at UNIT, Sarah Jane asks the Brigadier for a pass to tour the Think Tank research facility, and as they leave the lab, the Doctor sneaks in, finds his TARDIS key in his predecessor’s shoe, and almost makes it into the TARDIS before Doc Sullivan catches him.

At this point, we get our first really good look at the Fourth Doctor. His eyes are wild and fun, and so it his youth. He reminds me so much of Christopher Eccleston’s Ninth Doctor.

The Doctor tricks Sullivan and ties him up before trying to leave in the TARDIS, but Sarah Jane stops him and discusses the need for him to investigate the mysterious theft. The Doctor, still unstable, almost shrugs off this duty, but he stops as he remembers the Brigadier and Sarah Jane. The Doctor tries various wardrobe options to match his new persona – including a Viking ensemble, a royal outfit, and a clown suit – before settling on his trademark scarf, coat, and hat. After that, the game is afoot.

Sarah Jane arrives at Think Tank for her tour, and the franchise continues to be progressive with a female director, Hilda Winters, at the facility. Sarah Jane doesn’t expect it, and mistakes assistant Arnold Jellicoe for the director. The Think Tank facility has a robotics division, but the only roboticist, J. P. Kettelwell, left in a very public spectacle. As Sarah Jane chases that lead, the Doctor, Sullivan, and the Brigadier set a trap at the next piece for the disintegrator gun. The robot avoids them by burrowing underneath and stealing the part.

Sarah Jane interviews the roboticist, but that lead is a dead end, so she sneaks back into Think Tank and discovers the robot in the lab. The facility’s director claims that the robot, Experimental Prototype Robot K1, is completely for show, and demonstrates that the robot cannot kill based on the prime directive that it can never harm humanity. The First Law of Robotics lives on, at least in a fashion. Sarah Jane is coerced by the director to keep her experience secret. Of course, the first thing she does is tell the Doctor and the Brigadier.

Winters and Jellicoe reset the robot again – hello, modified Zeroth Law! – and send it out after Cabinet Minister Joseph Chambers. The Brigadier decides to send Sullivan on a James Bond-style mission into Think Tank while the Doctor decides to interview Kettlewell. The robot breaks into Chambers’s home, kills him, and steals some documents. The Brigadier, the Doctor, and Sarah Jane discuss the incident and the Think Tank’s association with the Scientific Reform Society, a group that advocates societal rule by the scientific elite.

The robot visits Kettlewell in a disoriented state, explaining that his orders conflict with his prime directive and seeking help. Sarah Jane visits the Scientific Reform Society while the Doctor and the Brigadier investigate Think Tank. Director Winters claims that the robot has been dismantled, and the Doctor uses his scarf to sweep the floor for clues. They are escorted out just as Sullivan arrives disguised as a medical inspector. Kettlewell later calls the Doctor and informs him that the robot is there, but Winters and Jellicoe arrive first.

The dressing of the Scientific Reform Society was a bit on the nose with the Nazi-like uniforms, attitudes, and symbology. They are bad guys. Like, really bad guys.

The Doctor leaves a note for Sarah Jane and Benton, then takes Bessie to meet the professor. The Doctor encounters the robot, who attacks him under orders. The Doctor tries to escape, but the robot knocks him down. It is about to kill him when Sarah Jane arrives and intervenes. K1 recognizes her and enters its logic loop once again, but UNIT arrives and opens fire. It flees Kettlewell’s lab under UNIT assault, and the professor is found tied up in a storage locker.

Sarah Jane tends to Kettlewell, and he tells her of the robot’s construction. It is made from a living metal, but fear not, because Kettlewell has also discovered a virus that can destroy the metal. Kettlewell mentions that he is a member of the Scientific Reform Society, but that he only visited once. Together, they make a plan to sneak Sarah Jane inside.

We also find that a stunning plot convenience – the combined nations of Russia, China, and America have entrusted the locations and launch codes for their nuclear arsenals to Great Britain – is now the key to the entire conflict. The robot stole that information from Chambers, and now Winters and Jellicoe likely have it.

At the SRS meeting, Winters introduces K1 and Kettlewell as allies, which shocks Sarah Jane. Even more shocking is their betrayal, which the Doctor disrupts after incapacitating the guards with his antics and scarf. Kettlewell’s goals are simple: With the Society’s help, he can finally make humanity to stop ruining the environment.

Wait. That’s it? Okay.

Winters orders the execution of the Doctor and Sarah Jane, but the Brigadier and UNIT arrive in explosive fashion. Winters, Jellicoe, and Kettlewell escape with the robot and Sarah Jane, and the antagonists uncover Sullivan when he calls the Brigadier. The entire Think Tank is moved to an underground atomic bunker. UNIT tries to storm the site, but Winters deflects them with the automated defense system. She demands the Brigadier’s surrender within 30 minutes, otherwise she will destroy the world in a nuclear holocaust. Having none of it, the Brigadier sends Benton to destroy the machine gun emplacements, and the Doctor uses his sonic screwdriver to detonate the landmines and open the bunker door. Director Winters arms K1 with the disintegrator gun and sends it out to deal with UNIT, where it kills one soldier and destroys a (toy) tank. That effects cheat makes sense since they spent so much on the visuals and new titles.

The action sequences were nice, but the Doctor’s youthful charm and comedic antics were the highlight. They’re kind of refreshing after the seriousness of Pertwee’s Doctor.

Director Winters tasks Kettlewell with unlocking the launch codes and linking the missiles to a worldwide network. She starts the countdown to launch, but Kettlewell stops it and escapes with Sarah Jane and Sullivan. Sarah Jane tries to reason with the robot, and it almost works, but the programming forces it to fire on Kettlewell, and murdering its creator sends it into a logical shutdown.

UNIT invades the bunker, but Winters has already transmitted the launch commands. The director runs while the Doctor reprograms the computer and stops the countdown. Sarah Jane wanders off and is taken by the robot, who is trying to reason out its logical conflict and decides to destroy humanity per Kettlewell’s desire. On a positive note, it chooses to save Sarah Jane.

The Brigadier wishes that he could meet an alien threat that wasn’t immune to bullets – Thank you, Brig! – and Benton tells the team about the living metal and the virus. The Doctor and Sullivan head to Kettlewell’s lab to find the virus as K1 locks the bunker and restarts the countdown. The countdown is thwarted by the fail-safes for each superpower’s warheads, so K1 takes Sarah Jane to the surface. The Brigadier shoots K1 with the disintegrator, but the plan backfires as K1 grows to immense size.

Note: Insert shark to jump here. The Fourth Doctor can borrow the Ninth Doctor’s leather coat.

K1 King Kongs Sarah Jane to a rooftop for her safety, then engages the UNIT troops in a terrible special effects spectacular. The Doctor and Sullivan arrive with the virus, and drive Bessie to K1’s feet and deploy the virus. The virus shrinks K1, then dissolves it completely.

Back in the lab, Sarah Jane is upset over K1’s destruction. The Doctor offers her a jelly baby to snap her out of her reverie, and then offers to take her away in the TARDIS.

I love his quote here: “There’s no point in being grown-up if you can’t be childish sometimes.”

Doctor Sullivan arrives just as they were about to leave, and he invites Sullivan along. The “bigger on the inside moment” is priceless as the Doctor is off once again.

With the story and the acting alone, this serial was scoring as a high 4 until the entire super robot fight. Even after that, it’s still good. Baker is delightful as the Doctor, and his companions have great chemistry. I settled on a 4 before adding in the regeneration handicap.


Rating: 5/5 – “Fantastic!”


UP NEXT – Doctor Who: The Ark in Space


The Timestamps Project is an adventure through the televised universe of Doctor Who, story by story, from the beginning of the franchise. For more reviews like this one, please visit the project’s page at Creative Criticality.


Timestamp #74: Planet of the Spiders

Doctor Who: Planet of the Spiders
(6 episodes, s11e21-e26, 1974)

Timestamp 074 Planet of the Spiders


I don’t like spiders. I’ll try not to let that color my commentary.

Mike Yates, who we haven’t seen since his betrayal of UNIT and the Doctor, is recuperating at a Buddhist meditation center led by a man named K’anpo and his assistant, Cho Je. He finds a secret group in the basement that may be up to no good, so he calls Sarah Jane and they investigate matters. On the way back to the center, Sarah Jane is convinced of the fascinating tale when they get run off the road by an imaginary tractor. The leader of the secret group, Mr. Lupton, meets the cinematic standard of a villain since he physically abuses and bullies Tom, a man with a mental disability.

The Doctor is at a comedy show of some sort with the Brigadier. He’s there to see a psychic, Professor Herbert Clegg, who he invites to UNIT. Clegg is a very powerful clairvoyant, and he submits to some experiments to determine his full strength. One, for example, summons experiences from the sonic screwdriver and displays them on a monitor. During this evaluation, a package arrives from Jo Grant containing the crystal from Metebilis III, which is an odd way to re-gift a wedding present. Professor Clegg has a violent psychic reaction to the crystal, resulting in a fatal fear-induced heart attack. Simultaneously, Lupton’s group summons an intelligent and powerful spider from another dimension, and that spider merges with Lupton’s body. Sarah Jane and Yates witness this event, and she returns to UNIT and relays the tale to the Doctor.

The Doctor gazes into the crystal, sees the hermit who lived behind his childhood home, and relays the story to the Brigadier. Meanwhile, Lupton is driven by the spider to seek the crystal at UNIT HQ. He forces his way in and steals the crystal, which prompts an extensive chase. Lupton steals the Whomobile, so Sgt. Benton, Sarah Jane, and the Brigadier follow in Bessie, while the Doctor provides air support in a small, one-man helicopter. After the whole group breaks some local speed laws, a police officer joins the chase in a moment of levity. After they all stop at an airport, Lupton steals the helicopter, and the Doctor and Sarah Jane continue pursuit in the Whomobile, which (conveniently) can now fly. The ground chase gives way to a water chase involving a hovercraft and a speedboat, which results in a several rather obvious reveals of the Jon Pertwee’s stunt double. When the Doctor finally catches up to the speedboat, Lupton has vanished.

Take a moment and catch your breath.

Lupton apparates back to the retreat and is seen by Tommy, who only has eyes for the crystal and covets it for his collection of “pretties.” As the Doctor and Sarah Jane track Lupton back to the retreat, the Lupton-Spider calls home to the spider community on Metebilis III and conspires to take over Earth. The spider attempts to coerce Lupton through telepathic pain, but Lupton levels up and reverses the effect on the spider. Meanwhile, Tommy steals the crystal and hides it in his cupboard under the stairs.

I found the fact that he lives under the stairs to be quite interesting. It’s part of the Madwoman in the Attic trope, where the socially undesirable member of the house is locked away from public view to save face. In some cases, this person ends up being the hero of the story of a fulcrum to pivot the plot and enable the hero to save the day. Three of my favorite examples are Boo Radley in To Kill a Mockingbird, Scorpius in Farscape, and Harry Potter in the franchise of the same name.

Tommy takes Sarah Jane to look at the crystal, but Sarah Jane overhears Lupton and follows him to the basement. She asks Tommy to relay her plans to Yates and watches Lupton apparate to Metebilis III. She inadvertently follows him and gets captured by a group of humans who are subjects to the queen spider and her society of Eight Legs. The queen just happens to visit the village and Sarah Jane is discovered. The Doctor gives chase in the TARDIS and arrives just as the queen discovers Sarah Jane. The Doctor gets into a fight with the queen’s human guards, and is eventually incapacitated and left for dead as the queen and her retinue depart. During the fracas, Sarah Jane hides in the crowd.

Back on Earth, Tommy gets into an altercation with Lupton’s comrades. He returns to his cupboard and gazes into the crystal, which heals his brain. On Metebilis III, Lupton realizes that he is a only a cog in the overall Eight Leg machine designed to overthrow the queen. Sarah Jane retrieves a machine from the TARDIS to help heal the Doctor, but she is captured by the Eight Legs. One of the indentured humans uses the machine to help the Doctor as Sarah Jane learns the history of Metebilis III from a fellow captive named Sabor. The humans are descendants of a crashed spaceship, and the Eight Legs are spiders that were on the ship and were mutated by the crystals.

The Doctor investigates different types of stones around the human village and finds one that negates the energy attacks of the Eight Legs followers. He infiltrates the spider fortress and is captured, but escapes using techniques learned from Harry Houdini. As the Doctor makes his way to the lair of the Great One, the supreme spider, the queen takes Sarah Jane and confides in her that the queen wants peace with humanity. Sarah Jane agrees to get the crystal if the humans are all released.

The Doctor reaches the lair of the Great One, but she warns him not to go any further due to intense radiation. She wants the crystal, the last perfect crystal of power, but the Doctor doesn’t yield. The Great One telepathically forces the Doctor to march about like a tin soldier (to music very reminiscent of the march of the Cybermen), before releasing him so he can retrieve the crystal. He escapes with Sarah Jane, who has apparently learned how to apparate from the queen, and they return to Earth.

Lupton’s followers open the gateway to the spiders, who transport to Earth. The spiders attack Cho Je and Yate, and then possess the followers. They then attack the Doctor and Sarah Jane, who are saved by Tommy before being taken to K’anpo. During their discussion, K’anpo is very impressed with the Doctor’s knowledge of Tibetan customs, and the Doctor feels that K’anpo is familiar to him.

In the interim, the spiders track the crystal to Tommy, and they fire on him with their Force lightning energy beams. At this point, it’s painfully obvious how much padding this serial has. The recaps in each episode are pretty long, but the last one is the proverbial straw that breaks the camel’s back with significant re-editing to reveal things that would have spoiled the cliffhanger. I’m sure it was different back in 1974 when the break between episodes was a whole week, but when they’re watched back-to-back, the extensive recaps become painful. Regardless, this whole serial could be cut down into three or four episodes instead of six.

Anyway, the spiders track the crystal to Tommy because Tommy delivered it to K’anpo. At this point, we find out that Sarah Jane is under the control of the queen, who has tricked her to retrieve the crystal. K’anpo and the Doctor free her with the crystal, and the queen dies as she apparates back to Metebilis III. In a twist, K’anpo is revealed as the hermit from the Doctor’s childhood. He is a Time Lord as well, but chose not to follow the path of others like the Doctor, having regenerated and left Gallifrey to live in Tibet. Cho Je is merely a projection of K’anpo’s mind.

Here we are with some important mythology points: We learn the name for regeneration, as well as getting another reference to the Doctor stealing the TARDIS and running from Gallifrey.

The Doctor communes with K’anpo and realizes that he must take the crystal to the Great One. His greed for knowledge and his theft of the crystal set all of this in motion, and only he can stop it by facing his fears.

Outside, Tommy is resisting the spider lightning, so Lupton’s followers channel power from the spider council on Metebilis III and use it to attack Tommy. He resists the first blast, and Yates dives in to take the second. The followers burst into K’anpo’s chambers just as the hermit tells the Doctor how to apparate. The followers shoot K’anpo before running for the basement, but the Doctor is too quick for them. He returns to Metebilis III, but is betrayed by the villagers who are under the influence of the spider council. The Doctor easily convinces the council that he will return the crystal to the Great One alone, and they allow him to leave. Afterward, the Eight Legs kill Lupton for his insolence.

Back on Earth, Yates and Tommy have (conveniently) survived, the former being protected by his compassion, and the latter by his innocence. Given that the same blasts force K’anpo to regenerate into Cho Je, I think that Yates and Tommy should have died. It certainly would have given Yates a bit of redemption after his betrayal.

The Doctor enters the lair of the Great One, who desires the perfect crystal to complete a telepathic weapon that will saturate the universe with her mind. She takes the crystal and puts it in place, but the device overloads and destroys her and the Eight Legs civilization. The Doctor escapes, but is weakened from the large dose of radiation he absorbed.

Three weeks later, the Doctor is still missing. As the Brigadier and Sarah Jane discuss the Doctor’s absence, the TARDIS materializes. The Doctor falls out of the TARDIS, just as he did when he first arrived, after being lost in the time vortex. He has received a fatal dose of radiation and is dying. He says his goodbyes to Sarah Jane, and then regenerates.

Tucked into his farewells is the phrase “Where there’s life, there is hope,” which comes from the Roman play Heauton Timorumenos, but also has roots all over mythology. It’s a universal theme, and very relevant to the character of the Doctor, a being who brings hope everywhere he goes spanning lifetime after lifetime.

Overall, I had a hard time with this story. If it were presented on its own, I’d score it as a 2. It’s far too spread out and padded, especially in the recaps, but it gains some salvation in the ties into the franchise’s mythology, especially for reaching into our hero’s childhood once again. Adding a point for those ties and another for the regeneration handicap, and this one comes to a total of 4, but I still think that it’s a pretty bad way for the Third Doctor to end his era.


Rating: 4/5 – “Would you care for a jelly baby?”


UP NEXT – Eleventh Series and Third Doctor Summary


The Timestamps Project is an adventure through the televised universe of Doctor Who, story by story, from the beginning of the franchise. For more reviews like this one, please visit the project’s page at Creative Criticality.


Timestamp #73: The Monster of Peladon

Doctor Who: The Monster of Peladon
(6 episodes, s11e15-e20, 1974)

Timestamp 073 The Monster of Peladon


The Doctor returns to Peladon, and that means we get more Aggedor! Well, kind of.

As this serial gets rolling, I hadn’t noticed before now that the opening credits have a glitch. When the Third Doctor transforms into a silhouette and joins the wormhole effect, the zooming leaves an artifact in the lower left corner of the screen until the Doctor Who logo appears. I can’t un-see it now.

Anyway, back to Peladon. Three miners are moving a device called the sonic lance when they are attacked by something called the “Spirit of Aggdeor”. It’s no surprise that the miners are afraid and refuse to work any longer, and it’s also no surprise that it’s time for the Doctor to arrive. Right on cue, the Doctor brings Sarah Jane to Peladon to show her “one of the most interesting places” he knows, and they are almost immediately apprehended.

They are taken before the queen, the daughter of the king we saw on the Doctor’s last trip to Peladon, who is working with the Federation delegates to keep mining production moving. Our travelers arrived in the height of war between the Federation and Galaxy Five, and their appearance correlates with fears of enemy spies being implanted in the Federation. It’s been fifty years since the Doctor was last on Peladon, but the queen knows the legends of the Doctor, and his life is saved by old friend Alpha Centauri, who vouches for the Doctor.

Sarah Jane is fiery. So awesome!

The miners are extracting a mineral for the war effort, and are upset with their way of life which hasn’t improved in the last fifty years. Their leadership is split between Gebek (who negotiates with the queen for improvement) and Ettis (who relies on violence, including taking over a Federation armory), and they have some unintentionally hilarious hairstyles.

After the Spirit attacks again, the Doctor appeals to the queen to let him investigate before she takes rash action against the rebels. The queen sends her champion with the Doctor to investigate the last site of the Spirit’s appearance when Ettis sets off an explosion. The Spirit appears, kills the champion, and then vanishes. Gebek uses the sonic lance to free the Doctor, who escapes just before the Spirit attacks again, and the Doctor and Gebek strike a deal for the good of Peladon to continue the investigation. The Doctor promises to convince the queen to improve conditions and the miners can get back to work. As the guards attack, the miners and the Doctor escape together.

Sarah Jane has gone to find the Doctor and gets lost, tripping a defense system near the refinery after seeing someone sneaking about inside. She is rescued by Alpha Centauri and Eckersley, a human miner. Meanwhile, Chancellor Ortron (mirroring High Priest Hepesh from the last Peladon adventure) convinces the queen that the Doctor is in league with the miners, and recommends that the Doctor be executed.

Ettis attacks Eckersley and forces Alpha Centauri and Sarah Jane to open the armory. After Alpha Centauri sounds the alarm, Ettis escapes with Sarah Jane, who then is captured by the palace guards. Ortron orders her taken to the temple and pins the rebellion on her and the Doctor. He throws them both into the pit to be disposed of by the real Aggedor.

Oh, Aggedor, I have missed you.

The Doctor uses the “God Rest Ye Merry Gentlemen” lullabye on Aggedor, which works just like it did fifty years before, and they are released by the queen. Thank the Maker that the queen is finally standing up for herself! She asks the Doctor to have Gebek meet with her and discuss the miners’ grievances. The Doctor departs on his mission, but asks Sarah Jane to remain and advise the queen in how to stand up for herself. Her advice: “There’s nothing ‘only’ about being a girl.”

Yes! She’s like Jo turned up to eleven.

Gebek tries to rally the miners to a peaceful situation, but Alpha Centauri has requested Federation military support, which may exacerbate the situation. As the Doctor gets ready to assuage that problem, Ortron orders the Doctor to remain in the Citadel, and when he tries to sneak out to meet with Gebek, Ortron has him arrested. Alpha Centauri and the queen lobby for his release, but Ortron declines. The queen orders that Sarah Jane is to remain free, and Ortron agrees since, as a female, Sarah Jane cannot be a problem.

When Ortron talks about the Doctor’s “rebel friends,” he rolls the R and enunciates much like Peter Cushing as Grand Moff Tarkin in Star Wars: A New Hope. It must be part of classical British acting classes.

Sarah Jane relays the Doctor’s message to Gebek, whose men have just secured the sonic lance by force. She later confers with the queen in the presence of Alpha Centauri and Ortron on how to dissuade the incoming Federation troops, who (by procedure) cannot be recalled once summoned. Sarah Jane heads for the dungeon to release the Doctor, but Gebek offers to go in her stead. Once free, the Doctor accompanies Gebek to the refinery as the miners set up the sonic lance and prepare to lay siege on the Citadel. During all of that, Alpha Centauri contacts the Federation troops, who sound a lot like Ice Warriors, and gets an update on their deployment.

Ortron puts the plan in action by appealing to the miners to return to work and promises that after the troops leave, the queen will listen to their grievances. They agree, but are immediately attacked by the Spirit. As they run, the Doctor finishes hotwiring the refinery door and reveals two Ice Warriors.

Wait. Aren’t the Ice Warriors supposed to be friendly on Peladon? Not anymore, it seems. They take the Doctor and Gebek captive and impose martial law on Peladon. All of the players are taken to the throne room, and the Ice Warrior commander, Azaxyr, summarizes the entire affair so that he has a clear picture. He returns the miners to work under Peladonian armed guards: If the miners fail to work, they will be killed, and if the miners and guards fail to follow the plan, the Ice Warriors will execute the hostages they have taken as collateral. The Ice Warriors claim to be a Federation force operating under wartime rules of engagement.

Ettis and his miner army storm the throne room to rescue Gebek, but are immediately slain by the Ice Warriors. Only Ettis escapes, and Azaxyr decides to execute the Doctor, but is convinced by Sarah Jane, Alpha Centauri, and Eckersley that only the Doctor can convince the miners to return to work. After the Ice Warriors leave to inspect the worksite, the Doctor reasons with Sarah Jane that the figure she saw in the refinery must have been the Ice Warrior guard Sskel, and that Azaxyr and Sskel must have been on the planet before the Federation troops arrived.

Sneaky, sneaky.

The Doctor returns to the throne room and asks the miners to return to work, but the Peladonians are united as a whole against the Ice Warriors. So he asks them to pretend to work until he can solve the problem, and they agree. The miners return to work as asked: They cooperate with Azaxyr exactly as they did with Ortron. Meanwhile, the Doctor raises the temperature in the mines to weaken the Ice Warriors and give the miners a fighting chance against them. The miners attack, but Gebek learns of Ettis’s plan to destroy the Citadel with the sonic lance. The Doctor goes after Ettis while Gebek keeps Sarah Jane safe, but Sarah Jane is captured by Sskel and interrogated by Azaxyr.

The Doctor fights Ettis and is defeated, but when Ettis tries to activate the sonic lance, a self-destruct circuit — one that Azaxyr enabled when he detected the rebels moving the machine into position — destroys the machine. Ettis is killed, and the Doctor is presumed dead. Azaxyr returns the mines to normal temperature and disables the ventilation system. The Doctor wakes up from the explosion and returns to the mines. He catches Gebek up on the situation, and the Doctor heads to the refinery to restore ventilation.

Sarah Jane stages a diversion to free the queen, Ortron, Alpha Centauri, and herself from the throne room, but only Alpha Centauri and Sarah Jane escape. Ortron is killed in the attempt while trying to protect the queen. Alpha Centauri and Sarah Jane take refuge in the communication room where the ambassador sends a general distress call and Sarah Jane discovers that Eckersley is conspiring with Azaxyr to corner the market on the minerals and ship it all to Galaxy Five. Eckersley is also controlling the Spirit of Aggedor, which is a matter projection of a statue with a directional heat ray. Sarah Jane sees the Doctor on the screen and runs to join him at the refinery.

That’s two serials in a row to use the combination of a galactic emergency, essential minerals, and cornering of markets to leverage power.

Eckersley and Azaxyr return to the Citadel, and Sarah Jane distracts the refinery guard long enough for the Doctor and Gebek to incapacitate him. Azaxyr discovers Alpha Centauri in the communications room, and the ambassador is sent back to the throne room where Azaxyr intimidates the queen and Alpha Centauri reveals the truth about Eckersley and Azaxyr. The ambassador is forced to reveal Sarah Jane’s whereabouts, and Sskel is dispatched to apprehend the team at the refinery. The Doctor defeats the Ice Warriors at the refinery door with the Spirit of Aggedor, and Sskel returns to Azaxyr.

Gebek rallies the miners and the guards while the Doctor controls the Spirit from the refinery, but Eckersley amplifies the security system until it drives Sarah Jane out of the refinery and overpowers the Doctor. The miners storm the Citadel with help from the Spirit of Aggedor. Sarah Jane returns to the Citadel and holds Eckersley at gunpoint until he disables the security system. He disarms her when she sees the unconscious Doctor on the screen, and Eckersley locks her in the communications room.

The miners storm the throne room to find Azaxyr holding the queen at gunpoint. The miners lay down their swords, but then attack the Ice Warriors hand-to-hand and kill them all. The queen sends Alpha Centauri to send a message to the Federation, where the ambassador frees a morose Sarah Jane who goes to the refinery. Meanwhile, Eckersley takes the queen hostage.

The Doctor wakes up, having placed himself in a sensory withdrawl trance, and shocks Sarah Jane. He mocks her for her concern, but they return together to the throne room and learn of the queen’s peril. The Doctor dispatches the real Aggedor like a bloodhound, and the creature finds and kills Eckersley. Sadly, it dies in the assault, and the Doctor mourns his friend’s death.

I mourn as well. I’m going to miss that critter.

A short time later, the Doctor, Sarah Jane, and the queen are gathered in the throne room where Gebek is named as the new chancellor and Alpha Centauri brings news of Galaxy Five’s surrender. As the Doctor and Sarah Jane leave, she ribs him over the queen’s offer to remain as her advisor, and he playfully pushes her into the TARDIS as they head off to the next adventure.


Rating: 4/5 – “Would you care for a jelly baby?”


UP NEXT – Doctor Who: Planet of the Spiders


The Timestamps Project is an adventure through the televised universe of Doctor Who, story by story, from the beginning of the franchise. For more reviews like this one, please visit the project’s page at Creative Criticality.