Timestamp #83: The Android Invasion

Doctor Who: The Android Invasion
(4 episodes, s13e13-e16, 1975)

Timestamp 083 The Android Invasion


London: Are they there yet? It looks like the right place and the right time, but appearances can be deceiving.

The Doctor has a new coat, and our heroes are being followed by a twitchy UNIT soldier as they explore the area. They encounter four figures in spacesuits who start shooting from their fingertips, and, of course, they run. Sarah Jane nearly bolts off a cliff, but the Doctor saves her. The twitchy soldier isn’t so lucky as he runs headlong to his doom.

Or does he?

There’s a body, which is a sure sign of death – well, usually – but that corpse’s wallet is full of shiny new coins, all from the same year. They discover a strange pod near the soldier, and then get shot at again by the trigger-happy spacers, so our heroes get to exercise Rule #1 of Zombieland. They eventually end up in the village of Devesham, but the town is abandoned. The pub is full of half-full drinks, those strange coins, and not much else, and Sarah Jane remembers from her days as a journalist that the space center is a short distance away.

Sarah Jane spots the spacers walking with the newly resurrected soldier, and she accidentally breaks a glass, which arouses suspicion. The spacers come close to opening the door when a pickup truck arrives with the villagers. They all stiffly walk about town, some of them filing into the pub and sitting down. An uncomfortable silence follows until the clock strikes eight, at which point everyone acts normally.

Yeah, that’s normal.

The Doctor heads for the space center to contact UNIT, and he leaves Sarah Jane (with the TARDIS key) to investigate the village. She is soon discovered, and the crowd is deathly silent. They ask her to leave, and she does, but encounters one of the spacers by the truck. When he turns, his face is all electronics. She runs away, and a clear theme is established: Running, and lots of it.

The Doctor arrives at the space center, but the place is deserted except for a single unresponsive soldier. Sarah Jane arrives at the TARDIS and places the key in the lock, but gets distracted by a pod nearby. The TARDIS dematerializes on its own and a figure grabs her from the pod. He attempts to strangle her, but she runs (again).

With all this running, I’d be dead by now.

At the space center, a disembodied voice called Styggron tells Crayford, a man with an eyepatch, that something is abnormal. Crayford investigates as the Doctor reaches the Brigadier’s office, which is empty. Crayford soon discovers the Doctor and interrogates him. The Doctor runs, and the UNIT soldiers open fire. He is soon apprehended, and Sarah Jane pursues his captors. She starts to unlock the door when a strange face peers out from the wall. It looks kind of Sontaran, but it’s not.

The mysterious voice hides again, but tells Crayford about the new arrivals. Crayford is excited by the development, but knows that they must be destroyed. Crazy thing: Crayford is supposed to be dead, a victim of an earlier spaceflight that Sarah Jane reported on, but he is clearly moving about. Meanwhile, the travelers run into Warrant Benton, but he pulls a gun on them. He appears to power down when Crayford orders the operation cancelled, and the Doctor and Sarah Jane hide. Soon after, Crayford orders Harry Sullivan to cordon off the perimeter, and the travelers decide to run for the village and attempt to warn London.

With friends like that, who needs enemies to run from?

Sarah Jane twists her ankle so the Doctor stashes her in a tree and distracts the pursuing dogs. The soldiers capture Sarah Jane (who left the tree) shortly thereafter. Sarah Jane wakes up strapped to an alien-looking table and being attended by Harry, who starts an analysis of her. The Doctor reaches the village and tries calling UNIT, but the phone is dead. The phone in the pub is also dead, and the keeper tells him that the lines are down after an overnight gale. The Doctor orders a ginger beer and throws darts, but discovers that the board has never been used. It is a camera for the aliens, who are watching everything.

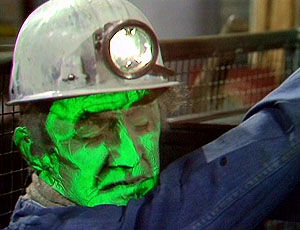
At this point, we get a good look at the non-Sontaran aliens. They are the Kralls. The makeup is pretty bad. The mouths do not move well at all.

Doctor Who has done better.

Anyway, the pub has other oddities: The horse brass on the wall is plastic and the calendar has only one date. The dead phone rings, revealing that Sarah Jane has escaped. She asks the Doctor to come to the village store, and after he hangs up, the phone once more becomes inoperative. The Doctor follows the clues to the store and Sarah Jane tells her story. He offers her ginger pop to soothe her nerves, something she couldn’t stand before, and she enjoys it. The Doctor puts all the pieces together and takes Sarah Jane back to the TARDIS.

Back in the secret base, the Krall use Crayford’s patterns to create a hostile android, which they use to demonstrate a newly developed weapon used to stop the androids. Meanwhile, the Doctor finally finds out that the TARDIS has dematerialized — presumably continuing on to Earth — and the he reasons that they are not on the real Earth and that Sarah Jane is not the real Sarah Jane. Sure enough, she attacks him, he pushes her away, and her face falls off to reveal an android. The Doctor runs off as the Sarah Jane-droid opens fire.

And just where was she keeping that pistol?

More details emerge about the dastardly plan: The Kralls intend to destroy the village in nine minutes, and plan to use the real Sarah Jane as a test for a virus to kill humans. Sarah Jane listens to the discussion, then sneaks away when the coast is clear. Back at the village, the spacer androids gather up the villagers and drive them back to the Krall ship. In the village, Stryggon restrains the Doctor as he places the bomb. Sarah Jane arrives (her ankle injury having mysteriously vanished) and saves him using the sonic screwdriver. They barely make it back to the base as the bomb explodes, eradicating the entire façade, but are immediately detained by the androids. In detention, the Doctor explains the android situation to Sarah Jane, deducing that they are on Oseidon.

So, not London.

Craydon comes in and explains his story: He’s contacted Earth with an elaborate hoax story, and he plans to return to Earth as a hero with the Kralls by his side. He claims that no humans will be harmed. The Kralls want the Northern Hemisphere, and they will leave the Southern Hemisphere for humanity. The Doctor is not sold on the story, and neither am I. I’m rather partial to the Northern Hemisphere.

Styggron has the Harry-droid spike a water pitcher with the virus and take it to the cell. Meanwhile, the Doctor opens the floor tiles and plans to electrocute the guards. The androids take the Doctor to the scanning room, but he warns Sarah Jane to save the water for the trap. As the Doctor is prepared, Styggron discloses his plans for human genocide.

Sarah Jane sets a small fire to lure the guard, then springs the trap and disables the android. She then rescues the Doctor from the scanner and they race for the rocket as it lifts off. Sarah Jane makes it into a protective pod, but the Doctor does not.

Cliffhanger: Will they survive?

Yes, and in cheap narrative fashion: The Doctor awakens her some time later. No really, that was it. All the race for the pods because they can’t survive the crushing g-forces and hey, by the way, nice nap you had there and by the way we’re going to ride these android pods to the surface but we may not survive re-entry since the pods aren’t designed for us.

On the real Earth, the real Harry, real Benton, and real acting commander Colonel Faraday monitor Crayford’s return. Benton and Harry are concerned since the TARDIS has arrived without the Doctor or Sarah Jane. The pods are sent to Earth, but the Doctor and Sarah Jane are separated on re-entry. Sarah Jane lands in the forest and finds the TARDIS. The Doctor-droid finds her and almost has her convinced that he’s real until a nearby pod opens to reveal a Sarah Jane-droid.

The Doctor reaches the space center and asks the guard (the model for the previously “dead” soldier) to notify him if another Doctor arrives. He asks the technicians to jam the electronics by pointing the radar dishes at the ground. Meanwhile, he figures out that key personnel have already been replaced and makes a run for it with Sarah Jane. The Doctor poses as his duplicate, re-enters the complex, and confers with the technician. The dishes are put in position, but the Doctor-droid stops him from turning on the power. Crayford stops the Doctor-droid from killing the technician and the Doctor, but is flabbergasted by the Krall plan for genocide. Crayford runs for the ship while the Doctor fights the Doctor-droid. The Doctor ends up near the control panel and turns on the jammer, stopping the androids in their tracks.

Sarah Jane reaches the ship and frees Harry and the colonel, but she is ambushed by Styggron. Crayford tries to stop Styggron but is killed. The Doctor-droid arrives and flips Styggron into the virus vial, and then the Doctor-droid is shot. The threat is over. The day is saved.

The Doctor and Sarah Jane arrive at the TARDIS, but Sarah Jane wants to go home, and this time by taxi. The Doctor offers to take her home in the TARDIS, and Sarah Jane relents.

She does know that she’s not going home yet, right?

This was a well-written adventure with a lot of twists and turns. They cheapened cliffhanger between episodes 3 and 4 stole some of the momentum, but I still had fun with it.


Rating: 4/5 – “Would you care for a jelly baby?”


UP NEXT – Doctor Who: The Brain of Morbius


The Timestamps Project is an adventure through the televised universe of Doctor Who, story by story, from the beginning of the franchise. For more reviews like this one, please visit the project’s page at Creative Criticality.


Advertisement

Timestamp #80: Terror of the Zygons

Doctor Who: Terror of the Zygons
(4 episodes, s13e01-e04, 1975)

Timestamp 080 Terror of the Zygons


A peaceful looking oil rig collapses into the ocean after a high-pitched chirping echoes throughout the structure. Welcome to Season 13 and the debut of the Zygons.

After receiving the emergency call from the Brigadier, the Doctor and his companions are back on Earth and walking through the countryside. The Doctor has embraced the Scottish theme of this story with a (unnamed) Tartan scarf and matching Tam O’Shanter hat, while his companions have adopted the typical hat and scarf. They hitch a ride to town with the Duke of Forgill, a local landowner who is upset about Hibernian Oil’s employees trespassing on his land, and meet up with the Brigadier and his Clan Stewart kilt.

You know, I’ve kind of missed him.

The Doctor is upset that he has been called back for a simple oil problem, hardly an emergency in his book, but agrees to help nonetheless. Harry goes to examine the injured rig crew in sickbay, Sarah Jane goes to interview the locals, and the Doctor joins the Brigadier to investigate the oil company. As Sarah Jane interviews Angus, the inn’s landlord, a Zygon eavesdrops on their conversation through an unknown bug. Angus thinks the Tulloch Moor is haunted, but Sarah Jane is not convinced.

While this is their first appearance in the franchise, I have seen the Zygons before in the new series. They really haven’t changed much over the years.

A survivor named Munro stumbles out of the ocean and Harry finds him. Caber, the Duke’s right-hand man, inexplicably shoots Munro and grazes Harry. The Doctor and Sarah Jane visit Harry in sickbay wher the Brigadier informs them of another oil rig collapse — the Zygons summoned a creature from the deep to destroy it — and the Doctor accompanies him as Sarah Jane tends to Harry. The Doctor examines part of the rig’s wreckage and discovers the imprint of a giant tooth.

Sister Lamont, the nurse who is attending to Harry is creepy. At first I thought she was a Ratched, but instead she’s a Zygon who attacks both companions. When the Doctor (who was on the phone with Sarah Jane when the Zygon struck) arrives the hospital, they companions are missing. The Doctor finds Sarah Jane in a decompression chamber and is trapped inside when he attempts to rescue her. He hypnotizes Sarah Jane to slow her breathing, then places himself into a trance as well. Meanwhile, Harry is taken to the Zygon ship, which is deep under the ocean. They crashed on Earth centuries before and waited for rescue, but their world was destroyed. The creature, a cyborg called a Skarasen, is their weapon and means of survival. If it dies, they die.

The Brigadier and his team are knocked out with poison gas, and the Doctor and Sarah Jane are rescued by Warrant Officer Benton. The trance was something he learned from a Tibetan monk. They return to the inn and discover that the same nerve gas that affected the Brigadier’s team also incapacitated the entire village. The Doctor receives a signal device, which controls the Skarasen, and the Zygons are upset by the turn of events. The take Harry to the chamber to become the pattern for one of the Zygon invaders.

The Brigadier’s team recovers and discovers one of the UNIT patrol soldiers who was killed by the creature. The Doctor goes to investigate and leaves Sarah Jane at the inn, much to the Zygon’s delight. Harry’s doppelgänger arrives, steals the device, and runs, leading Sarah Jane and some troops on a chase. She finds him in a barn, and he attacks her, but he falls on his pitchfork and reverts into Zygon form before dying. The Zygons disperse the corpse before Sarah Jane brings UNIT to see it.

Sarah Jane deduces that the Zygons are spying on UNIT, and the Zygons send the Skarasen to destroy them. The Doctor lures the beast away in a truck as the Brigadier tracks the signal’s origin. The Skarasen chases the Doctor, who has to run after the truck runs out of fuel and the tracker attaches itself to his hand. The Brigadier traces the signal to Loch Ness.

Ah, of course: Nessie is an alien cyborg.

Harry bursts into the control room and starts mashing buttons on the console, which conveniently results in the tracker falling off the Doctor’s hand. In a terrible special effects sequence, the Skarasen crushes the tracker, which stops the signal and makes the Zygons assume that the Doctor is dead. Meanwhile, Benton is searching the inn for bugs, and we figure out that the Duke’s prized deer head trophy is the transmitter.

After finding out where the signal came from, the Doctor asks Sarah Jane and the Brigadier to take him to the Duke’s castle. The Duke does not believe their tale, and he refuses to allow UNIT to use depth charges in the loch. Back at the inn, Angus discovers the deer head transmitter, and the nurse goes full Zygon on him and removes the eye. Benton and his team give chase into the woods, shooting at the Zygon as it flees, and report to the Brigadier that they have it cornered. The Doctor and the Brigadier leave Sarah Jane to investigate the Duke’s library as they rendezvous with Benton. The Zygon resumes its form as Sister Lamont, knocks out a UNIT soldier, and escapes. The Doctor discovers the missing eye and concludes that the Duke is a Zygon agent.

At the Duke’s castle, Sarah Jane discovers a hidden passageway behind the bookshelf and follows it straight to the Zygon ship. Shortly afterward, the Duke finds out about her intrusion. He and Caber help the injured Sister Lamont doppelgänger back to the ship, and the Duke orders Caber to find and destroy Sarah Jane.

Sarah Jane rescues Harry and they return to the Doctor and the Brigadier. The Doctor heads to the ship but is intercepted by Zygons and held hostage. The Zygons tell the companions that the oil rigs were only the prelude to the “big event”. UNIT begins shelling the loch and the Zygon ship surfaces and flies away. The Brigadier prepares to follow, but the companions suggest searching the castle for clues. Sarah Jane discovers that the Duke is the President of the Scottish Energy Commission, but Harry dismisses the information and they join the Brigadier for a trip back to London.

The Zygon ship lands at a disused quarry, but UNIT cannot track it due to a jamming signal. Broton, the Zygon leader and Duke doppelgänger, tells the Doctor that a refugee fleet is on its way to Earth, but in the intervening centuries, the planet must be rebuilt to suit them. After Broton leaves, the Doctor rigs some of the technology in his cell, which electrocutes him but broadcasts a tracking signal to UNIT. The Zygons leave the Doctor for dead, but he comes to, infiltrates the body print center, and frees the humans being held there. He then blows up the ship using the self-destruct mechanism, which is a bit bloodthirsty, but he did try negotiating first.

Broton, having left moments before, goes to place a tracker on the target so Skarasen can destroy it. The Brigadier and the companions figure out that the International Energy Conference is the target, and that the Broton can get in using the Duke’s credentials. They all reconvene there, and the Doctor confronts the Zygon. Sarah Jane summons the Brigadier, who shoots and kills Broton.

Hey, firearms finally worked!

The Doctor takes the tracker and rushes outside where he feeds it to the Skarasen. The creature returns to the river and swims back to Loch Ness, and thus we have the legend. The team returns to the TARDIS near the loch, and the Doctor offers them all a ride home, but only Sarah Jane joins him with one proviso: They are to return straight to London.

Yeah, right.

We finally say goodbye to Harry. I can’t say that I’ll miss him, but I can say that he’ll join the ranks of Steven Taylor as one of my least favorite companions.

As far as the story goes, it’s lackluster and all over the map. It’s an unfortunate case of style over substance: The Zygons and their ship were well done for the era, and the story plays on the prevalent oil-politics in the news, but it also heavily leans on Scottish stereotypes to drive the story, and I had a hard time getting around them. From the very first line haggis-laden line of the first episode, the story jumps from kilts to beards to bagpipes to second sight to the Loch Ness Monster, and it finishes on a joke about stingy Scotsmen.

Don’t get me wrong: It’s nice to visit Scotland again, but this doesn’t come close to the spirit of Jamie McCrimmon. It was a fun, but ultimately routine and forgettable romp.


Rating: 3/5 – “Reverse the polarity of the neutron flow.”


UP NEXT – Doctor Who: Planet of Evil


The Timestamps Project is an adventure through the televised universe of Doctor Who, story by story, from the beginning of the franchise. For more reviews like this one, please visit the project’s page at Creative Criticality.


Timestamp #75: Robot

Doctor Who: Robot
(4 episodes, s12e01-e04, 1974-75)

Timestamp 075 Robot


It’s never easy changing Doctors, but I think I’m going to like this one.

Things start out with another new title sequence, which is great, but I kind of miss the warp stars. The story itself kicks off with a delirious Doctor who mentions previous adventures as Lieutenant Harry Sullivan, UNIT’s staff physician, takes the Time Lord to the infirmary. Congratulations are also in order as Benton’s been promoted to Warrant Officer. That’s one big wetting-down party.

As the heroes get sorted out, a robot infiltrates a military facility. It kills a dog, so we know it’s bad, and steals top secret disintegrator gun plans. Back at UNIT, Sarah Jane asks the Brigadier for a pass to tour the Think Tank research facility, and as they leave the lab, the Doctor sneaks in, finds his TARDIS key in his predecessor’s shoe, and almost makes it into the TARDIS before Doc Sullivan catches him.

At this point, we get our first really good look at the Fourth Doctor. His eyes are wild and fun, and so it his youth. He reminds me so much of Christopher Eccleston’s Ninth Doctor.

The Doctor tricks Sullivan and ties him up before trying to leave in the TARDIS, but Sarah Jane stops him and discusses the need for him to investigate the mysterious theft. The Doctor, still unstable, almost shrugs off this duty, but he stops as he remembers the Brigadier and Sarah Jane. The Doctor tries various wardrobe options to match his new persona – including a Viking ensemble, a royal outfit, and a clown suit – before settling on his trademark scarf, coat, and hat. After that, the game is afoot.

Sarah Jane arrives at Think Tank for her tour, and the franchise continues to be progressive with a female director, Hilda Winters, at the facility. Sarah Jane doesn’t expect it, and mistakes assistant Arnold Jellicoe for the director. The Think Tank facility has a robotics division, but the only roboticist, J. P. Kettelwell, left in a very public spectacle. As Sarah Jane chases that lead, the Doctor, Sullivan, and the Brigadier set a trap at the next piece for the disintegrator gun. The robot avoids them by burrowing underneath and stealing the part.

Sarah Jane interviews the roboticist, but that lead is a dead end, so she sneaks back into Think Tank and discovers the robot in the lab. The facility’s director claims that the robot, Experimental Prototype Robot K1, is completely for show, and demonstrates that the robot cannot kill based on the prime directive that it can never harm humanity. The First Law of Robotics lives on, at least in a fashion. Sarah Jane is coerced by the director to keep her experience secret. Of course, the first thing she does is tell the Doctor and the Brigadier.

Winters and Jellicoe reset the robot again – hello, modified Zeroth Law! – and send it out after Cabinet Minister Joseph Chambers. The Brigadier decides to send Sullivan on a James Bond-style mission into Think Tank while the Doctor decides to interview Kettlewell. The robot breaks into Chambers’s home, kills him, and steals some documents. The Brigadier, the Doctor, and Sarah Jane discuss the incident and the Think Tank’s association with the Scientific Reform Society, a group that advocates societal rule by the scientific elite.

The robot visits Kettlewell in a disoriented state, explaining that his orders conflict with his prime directive and seeking help. Sarah Jane visits the Scientific Reform Society while the Doctor and the Brigadier investigate Think Tank. Director Winters claims that the robot has been dismantled, and the Doctor uses his scarf to sweep the floor for clues. They are escorted out just as Sullivan arrives disguised as a medical inspector. Kettlewell later calls the Doctor and informs him that the robot is there, but Winters and Jellicoe arrive first.

The dressing of the Scientific Reform Society was a bit on the nose with the Nazi-like uniforms, attitudes, and symbology. They are bad guys. Like, really bad guys.

The Doctor leaves a note for Sarah Jane and Benton, then takes Bessie to meet the professor. The Doctor encounters the robot, who attacks him under orders. The Doctor tries to escape, but the robot knocks him down. It is about to kill him when Sarah Jane arrives and intervenes. K1 recognizes her and enters its logic loop once again, but UNIT arrives and opens fire. It flees Kettlewell’s lab under UNIT assault, and the professor is found tied up in a storage locker.

Sarah Jane tends to Kettlewell, and he tells her of the robot’s construction. It is made from a living metal, but fear not, because Kettlewell has also discovered a virus that can destroy the metal. Kettlewell mentions that he is a member of the Scientific Reform Society, but that he only visited once. Together, they make a plan to sneak Sarah Jane inside.

We also find that a stunning plot convenience – the combined nations of Russia, China, and America have entrusted the locations and launch codes for their nuclear arsenals to Great Britain – is now the key to the entire conflict. The robot stole that information from Chambers, and now Winters and Jellicoe likely have it.

At the SRS meeting, Winters introduces K1 and Kettlewell as allies, which shocks Sarah Jane. Even more shocking is their betrayal, which the Doctor disrupts after incapacitating the guards with his antics and scarf. Kettlewell’s goals are simple: With the Society’s help, he can finally make humanity to stop ruining the environment.

Wait. That’s it? Okay.

Winters orders the execution of the Doctor and Sarah Jane, but the Brigadier and UNIT arrive in explosive fashion. Winters, Jellicoe, and Kettlewell escape with the robot and Sarah Jane, and the antagonists uncover Sullivan when he calls the Brigadier. The entire Think Tank is moved to an underground atomic bunker. UNIT tries to storm the site, but Winters deflects them with the automated defense system. She demands the Brigadier’s surrender within 30 minutes, otherwise she will destroy the world in a nuclear holocaust. Having none of it, the Brigadier sends Benton to destroy the machine gun emplacements, and the Doctor uses his sonic screwdriver to detonate the landmines and open the bunker door. Director Winters arms K1 with the disintegrator gun and sends it out to deal with UNIT, where it kills one soldier and destroys a (toy) tank. That effects cheat makes sense since they spent so much on the visuals and new titles.

The action sequences were nice, but the Doctor’s youthful charm and comedic antics were the highlight. They’re kind of refreshing after the seriousness of Pertwee’s Doctor.

Director Winters tasks Kettlewell with unlocking the launch codes and linking the missiles to a worldwide network. She starts the countdown to launch, but Kettlewell stops it and escapes with Sarah Jane and Sullivan. Sarah Jane tries to reason with the robot, and it almost works, but the programming forces it to fire on Kettlewell, and murdering its creator sends it into a logical shutdown.

UNIT invades the bunker, but Winters has already transmitted the launch commands. The director runs while the Doctor reprograms the computer and stops the countdown. Sarah Jane wanders off and is taken by the robot, who is trying to reason out its logical conflict and decides to destroy humanity per Kettlewell’s desire. On a positive note, it chooses to save Sarah Jane.

The Brigadier wishes that he could meet an alien threat that wasn’t immune to bullets – Thank you, Brig! – and Benton tells the team about the living metal and the virus. The Doctor and Sullivan head to Kettlewell’s lab to find the virus as K1 locks the bunker and restarts the countdown. The countdown is thwarted by the fail-safes for each superpower’s warheads, so K1 takes Sarah Jane to the surface. The Brigadier shoots K1 with the disintegrator, but the plan backfires as K1 grows to immense size.

Note: Insert shark to jump here. The Fourth Doctor can borrow the Ninth Doctor’s leather coat.

K1 King Kongs Sarah Jane to a rooftop for her safety, then engages the UNIT troops in a terrible special effects spectacular. The Doctor and Sullivan arrive with the virus, and drive Bessie to K1’s feet and deploy the virus. The virus shrinks K1, then dissolves it completely.

Back in the lab, Sarah Jane is upset over K1’s destruction. The Doctor offers her a jelly baby to snap her out of her reverie, and then offers to take her away in the TARDIS.

I love his quote here: “There’s no point in being grown-up if you can’t be childish sometimes.”

Doctor Sullivan arrives just as they were about to leave, and he invites Sullivan along. The “bigger on the inside moment” is priceless as the Doctor is off once again.

With the story and the acting alone, this serial was scoring as a high 4 until the entire super robot fight. Even after that, it’s still good. Baker is delightful as the Doctor, and his companions have great chemistry. I settled on a 4 before adding in the regeneration handicap.


Rating: 5/5 – “Fantastic!”


UP NEXT – Doctor Who: The Ark in Space


The Timestamps Project is an adventure through the televised universe of Doctor Who, story by story, from the beginning of the franchise. For more reviews like this one, please visit the project’s page at Creative Criticality.


Timestamp #74: Planet of the Spiders

Doctor Who: Planet of the Spiders
(6 episodes, s11e21-e26, 1974)

Timestamp 074 Planet of the Spiders


I don’t like spiders. I’ll try not to let that color my commentary.

Mike Yates, who we haven’t seen since his betrayal of UNIT and the Doctor, is recuperating at a Buddhist meditation center led by a man named K’anpo and his assistant, Cho Je. He finds a secret group in the basement that may be up to no good, so he calls Sarah Jane and they investigate matters. On the way back to the center, Sarah Jane is convinced of the fascinating tale when they get run off the road by an imaginary tractor. The leader of the secret group, Mr. Lupton, meets the cinematic standard of a villain since he physically abuses and bullies Tom, a man with a mental disability.

The Doctor is at a comedy show of some sort with the Brigadier. He’s there to see a psychic, Professor Herbert Clegg, who he invites to UNIT. Clegg is a very powerful clairvoyant, and he submits to some experiments to determine his full strength. One, for example, summons experiences from the sonic screwdriver and displays them on a monitor. During this evaluation, a package arrives from Jo Grant containing the crystal from Metebilis III, which is an odd way to re-gift a wedding present. Professor Clegg has a violent psychic reaction to the crystal, resulting in a fatal fear-induced heart attack. Simultaneously, Lupton’s group summons an intelligent and powerful spider from another dimension, and that spider merges with Lupton’s body. Sarah Jane and Yates witness this event, and she returns to UNIT and relays the tale to the Doctor.

The Doctor gazes into the crystal, sees the hermit who lived behind his childhood home, and relays the story to the Brigadier. Meanwhile, Lupton is driven by the spider to seek the crystal at UNIT HQ. He forces his way in and steals the crystal, which prompts an extensive chase. Lupton steals the Whomobile, so Sgt. Benton, Sarah Jane, and the Brigadier follow in Bessie, while the Doctor provides air support in a small, one-man helicopter. After the whole group breaks some local speed laws, a police officer joins the chase in a moment of levity. After they all stop at an airport, Lupton steals the helicopter, and the Doctor and Sarah Jane continue pursuit in the Whomobile, which (conveniently) can now fly. The ground chase gives way to a water chase involving a hovercraft and a speedboat, which results in a several rather obvious reveals of the Jon Pertwee’s stunt double. When the Doctor finally catches up to the speedboat, Lupton has vanished.

Take a moment and catch your breath.

Lupton apparates back to the retreat and is seen by Tommy, who only has eyes for the crystal and covets it for his collection of “pretties.” As the Doctor and Sarah Jane track Lupton back to the retreat, the Lupton-Spider calls home to the spider community on Metebilis III and conspires to take over Earth. The spider attempts to coerce Lupton through telepathic pain, but Lupton levels up and reverses the effect on the spider. Meanwhile, Tommy steals the crystal and hides it in his cupboard under the stairs.

I found the fact that he lives under the stairs to be quite interesting. It’s part of the Madwoman in the Attic trope, where the socially undesirable member of the house is locked away from public view to save face. In some cases, this person ends up being the hero of the story of a fulcrum to pivot the plot and enable the hero to save the day. Three of my favorite examples are Boo Radley in To Kill a Mockingbird, Scorpius in Farscape, and Harry Potter in the franchise of the same name.

Tommy takes Sarah Jane to look at the crystal, but Sarah Jane overhears Lupton and follows him to the basement. She asks Tommy to relay her plans to Yates and watches Lupton apparate to Metebilis III. She inadvertently follows him and gets captured by a group of humans who are subjects to the queen spider and her society of Eight Legs. The queen just happens to visit the village and Sarah Jane is discovered. The Doctor gives chase in the TARDIS and arrives just as the queen discovers Sarah Jane. The Doctor gets into a fight with the queen’s human guards, and is eventually incapacitated and left for dead as the queen and her retinue depart. During the fracas, Sarah Jane hides in the crowd.

Back on Earth, Tommy gets into an altercation with Lupton’s comrades. He returns to his cupboard and gazes into the crystal, which heals his brain. On Metebilis III, Lupton realizes that he is a only a cog in the overall Eight Leg machine designed to overthrow the queen. Sarah Jane retrieves a machine from the TARDIS to help heal the Doctor, but she is captured by the Eight Legs. One of the indentured humans uses the machine to help the Doctor as Sarah Jane learns the history of Metebilis III from a fellow captive named Sabor. The humans are descendants of a crashed spaceship, and the Eight Legs are spiders that were on the ship and were mutated by the crystals.

The Doctor investigates different types of stones around the human village and finds one that negates the energy attacks of the Eight Legs followers. He infiltrates the spider fortress and is captured, but escapes using techniques learned from Harry Houdini. As the Doctor makes his way to the lair of the Great One, the supreme spider, the queen takes Sarah Jane and confides in her that the queen wants peace with humanity. Sarah Jane agrees to get the crystal if the humans are all released.

The Doctor reaches the lair of the Great One, but she warns him not to go any further due to intense radiation. She wants the crystal, the last perfect crystal of power, but the Doctor doesn’t yield. The Great One telepathically forces the Doctor to march about like a tin soldier (to music very reminiscent of the march of the Cybermen), before releasing him so he can retrieve the crystal. He escapes with Sarah Jane, who has apparently learned how to apparate from the queen, and they return to Earth.

Lupton’s followers open the gateway to the spiders, who transport to Earth. The spiders attack Cho Je and Yate, and then possess the followers. They then attack the Doctor and Sarah Jane, who are saved by Tommy before being taken to K’anpo. During their discussion, K’anpo is very impressed with the Doctor’s knowledge of Tibetan customs, and the Doctor feels that K’anpo is familiar to him.

In the interim, the spiders track the crystal to Tommy, and they fire on him with their Force lightning energy beams. At this point, it’s painfully obvious how much padding this serial has. The recaps in each episode are pretty long, but the last one is the proverbial straw that breaks the camel’s back with significant re-editing to reveal things that would have spoiled the cliffhanger. I’m sure it was different back in 1974 when the break between episodes was a whole week, but when they’re watched back-to-back, the extensive recaps become painful. Regardless, this whole serial could be cut down into three or four episodes instead of six.

Anyway, the spiders track the crystal to Tommy because Tommy delivered it to K’anpo. At this point, we find out that Sarah Jane is under the control of the queen, who has tricked her to retrieve the crystal. K’anpo and the Doctor free her with the crystal, and the queen dies as she apparates back to Metebilis III. In a twist, K’anpo is revealed as the hermit from the Doctor’s childhood. He is a Time Lord as well, but chose not to follow the path of others like the Doctor, having regenerated and left Gallifrey to live in Tibet. Cho Je is merely a projection of K’anpo’s mind.

Here we are with some important mythology points: We learn the name for regeneration, as well as getting another reference to the Doctor stealing the TARDIS and running from Gallifrey.

The Doctor communes with K’anpo and realizes that he must take the crystal to the Great One. His greed for knowledge and his theft of the crystal set all of this in motion, and only he can stop it by facing his fears.

Outside, Tommy is resisting the spider lightning, so Lupton’s followers channel power from the spider council on Metebilis III and use it to attack Tommy. He resists the first blast, and Yates dives in to take the second. The followers burst into K’anpo’s chambers just as the hermit tells the Doctor how to apparate. The followers shoot K’anpo before running for the basement, but the Doctor is too quick for them. He returns to Metebilis III, but is betrayed by the villagers who are under the influence of the spider council. The Doctor easily convinces the council that he will return the crystal to the Great One alone, and they allow him to leave. Afterward, the Eight Legs kill Lupton for his insolence.

Back on Earth, Yates and Tommy have (conveniently) survived, the former being protected by his compassion, and the latter by his innocence. Given that the same blasts force K’anpo to regenerate into Cho Je, I think that Yates and Tommy should have died. It certainly would have given Yates a bit of redemption after his betrayal.

The Doctor enters the lair of the Great One, who desires the perfect crystal to complete a telepathic weapon that will saturate the universe with her mind. She takes the crystal and puts it in place, but the device overloads and destroys her and the Eight Legs civilization. The Doctor escapes, but is weakened from the large dose of radiation he absorbed.

Three weeks later, the Doctor is still missing. As the Brigadier and Sarah Jane discuss the Doctor’s absence, the TARDIS materializes. The Doctor falls out of the TARDIS, just as he did when he first arrived, after being lost in the time vortex. He has received a fatal dose of radiation and is dying. He says his goodbyes to Sarah Jane, and then regenerates.

Tucked into his farewells is the phrase “Where there’s life, there is hope,” which comes from the Roman play Heauton Timorumenos, but also has roots all over mythology. It’s a universal theme, and very relevant to the character of the Doctor, a being who brings hope everywhere he goes spanning lifetime after lifetime.

Overall, I had a hard time with this story. If it were presented on its own, I’d score it as a 2. It’s far too spread out and padded, especially in the recaps, but it gains some salvation in the ties into the franchise’s mythology, especially for reaching into our hero’s childhood once again. Adding a point for those ties and another for the regeneration handicap, and this one comes to a total of 4, but I still think that it’s a pretty bad way for the Third Doctor to end his era.


Rating: 4/5 – “Would you care for a jelly baby?”


UP NEXT – Eleventh Series and Third Doctor Summary


The Timestamps Project is an adventure through the televised universe of Doctor Who, story by story, from the beginning of the franchise. For more reviews like this one, please visit the project’s page at Creative Criticality.


Timestamp #71: Invasion of the Dinosaurs

Doctor Who: Invasion of the Dinosaurs
(6 episodes, s11e05-e10, 1974)

Timestamp 071 Invasion of the Dinosaurs


It’s an invasion! But you don’t know what’s invading until the second episode! Or until you read the title of this Timestamp!

Sorry for the spoilers.

Actually, it’s fairly clever to hide the plot device by changing the name of the first episode. I mean, it’s pretty fun to figure out why London is empty – a feat that had to be fun to orchestrate and film – except for UNIT, the regular army (led by General Finch), and looters avoiding the martial law imposed on the evacuated metropolis. It’s even more clever to make this the “real” timeline instead of an alternate or parallel timeline from the actual events. The history books never really explain the great British dinosaur invasion of Nineteen-Seventy-something-something.

The Doctor and Sarah Jane explore the area, get robbed, try calling the police, and get distracted as their robber’s car gets into an accident. That seemed like a particularly grisly scene for this show. As the pair keep looking about, they encounter more looters and a pterodactyl before being apprehended by the army.  In a humorous bit, they are designated as Prisoners 177781 and 177782 as they keep disrupting the booking process. Luckily, once they are on the official books, the Brigadier and Sgt Benton discover their status and send a dispatch to retrieve them.

Did I mention pterodactyl? Yeah, the city is being evacuated because of dinosaurs.

The travelers are sentenced to a detention camp, but before they depart, the Doctor stages a fight with a fellow prisoner, then subdues the guard before making a run for it. The duo are soon captured again and loaded into a truck for transfer, but the truck gets ambushed by a tyrannosaurus rex.

Unfortunately, the tyrannosaur’s appearance highlights just how terrible the dinosaur effects are.

The travelers escape and hide in a garage where they meet a medieval peasant – not a dinosaur – who believes that the Doctor is a wizard. He attacks the Doctor with a knife but then disappears back to his own time. Soldiers soon arrive, accompanied by the Brigadier, and the group returns to the temporary UNIT HQ where the Brigadier explains the situation. The Doctor theorizes that the dinosaurs are moving back and forth through time, but he doesn’t know who is controlling the process. The general, accompanied by Captain Yates fresh off leave after the adventure with the mine maggots, doesn’t believe any of it.

The Doctor and Brigadier go out to a dinosaur sighting where they find a stegosaurus. The dinosaur fades away into a time eddy, and the localized distortion makes time run backwards for the witnesses, which eliminates the memory of the transition. The Doctor works on a gadget to knock out a dinosaur and track the temporal distortions, which are the result of Professor Whitaker and fellow scientist Butler’s experiments.  Unfortunately, Yates is working with the scientists, and proposes that the Doctor could be helpful to them. Whitaker declines in order to protect the operation and directs Yates to break the dinosaur stunner. Yates accompanies the Doctor and Brigadier to a dinosaur sighting, and sabotages the stunner. A time eddy takes the apatosaurus away, but a tyrannosaur appears behind them.

In trying to escape the threat, the Doctor falls, and Yates rushes to his rescue, fixing the stunner and taking down the dinosaur. Yates berates the scientists for trying to kill the Doctor, but agrees to sabotage the Doctor’s efforts to track Whitaker. Sarah Jane, who is still a reporter, has also been working on finding him for months.

Yates continues to hinder the Doctor by breaking the tracker. Sarah Jane gets permission to photograph the T. rex, and it wakes up and chases her because General Finch has loosened its chains. The Doctor rescues her, and Sarah Jane begins her own investigation as the Doctor begins work on a smaller, portable tracking device. Sarah Jane’s investigation leads her to an ecologist Member of Parliament, Sir Charles Grover, who is the acting Minister with Special Responsibilities in London. When she presses her points, he drugs her. She wakes up on a spaceship three months away from Earth.

Wait, what? Where did that come from?

The spaceship is filled with minor celebrities and is bound for New Earth, a pure, younger version of the current Earth. There are over 200 people on the ship in stasis, and there are seven ships. I’m not sure that 1400 people are enough for a diverse gene pool, but the concept is there I suppose. Sarah Jane questions things, so the others send to the re-education program so she can be trained to think like them.

The Doctor drives his new Whomobile – Where is Bessie and what is this shark-jumper? – and tracks the temporal distortions to an abandoned Underground station. He discovers a hidden elevator and takes it down to the lab and heads toward the reactor. The scientists steer him back to the elevator by closing a series of doors (which make the sets shimmy), and then they set a pterodactyl on him. He fights it off and escapes.

The Doctor brings the Brigadier back to the station, but the elevator has been disabled. The two of them confer with MP Grover who tries to deflect them, and Operation Golden Age, a plan to establish a fresh start for humanity by rolling back time across the entire planet, now conspires to discredit the Doctor.  Whitaker comes out of hiding, pretends to be an innocent bystander in the affair, and asks the Doctor to meet him in the hangar. The scientists drop a stegosaurus in the hangar when the Doctor arrives, and Finch brings in the Brigadier to reveal the “true” perpetrator. The Brigadier places the Doctor under arrest, which helps the Doctor to uncover the UNIT mole when Yates will not help him escape. Sgt Benton, on the other hand, allows the Doctor to run so he can unravel the mystery.

Sarah Jane attempts to convince Mark, a fellow captive on the spaceship, that the whole thing is a elaborate ruse. He watches her depressurize and step out of the airlock without being harmed. As the Doctor evades capture by an army squad, Sarah Jane is captured by Finch after trusting him with what she’s discovered. MP Grover explains the plan to her, and then starts rolling back pockets of time. Coincidentally, this leaves the Doctor surrounded by dinosaurs. The dinosaurs fight each other in a bloodless battle (which is strange since the car accident victim in the first episode was a bloody mess), and the Doctor runs only to be apprehended by Finch and the Brigadier. The Brigadier asserts his authority to take custody of the Doctor, and they return to the temporary HQ where Yates holds everyone at gunpoint. He explains the plot to the Doctor, the Brigadier, and Benton, but is distracted by another soldier which allows Benton to disarm him.

Sarah Jane returns to the spaceship, convincing Mark that it’s all fake, and they set out to reveal it to everyone on board. They get locked away for disruptive behavior. Adam, the ship’s leader, calls MP Grover and explains the situation. Grover comes into the spaceship set in a spacesuit, and berates Sarah Jane in her cell. Adam overhears the discussion and frees Mark and Sarah Jane. Sarah Jane demonstrates that the airlock is not real, and the captives escape.

So, there’s only one ship. That’s 200 people. That’s definitely not enough for diverse gene pool.

Also, everyone we saw on the ship was white. Oops.

Anyway, the Doctor and the Brigadier infiltrate the underground lab. The Doctor goes in while the Brigadier calls for reinforcements, but Benton is held at gunpoint by Finch. Benton overpowers the general and dispatches the reinforcements. Everyone confronts Grover and the scientists, and Whitaker responds by throwing the switch. It freezes everyone except (conveniently) the Doctor, and he stops the process and reverses the polarity of the machine. Grover throws the switch again, but it sends Whitaker, Grover, and the machine back in time to their Golden Age, presumably as dino snacks.

The bad guys are put away, Yates is given the opportunity to resign quietly, and the Doctor convinces Sarah Jane to travel with him.

I loved the interaction between the Brigadier and the Doctor. We don’t see a lot of that, so it’s refreshing when it happens. I also loved how much of a hero Benton became with this story. Sarah Jane is a-maz-ing, and I’m so happy to see her character in these stories.

On the costume front, the Doctor’s green and brown outfit was a good break, but I really like this blue and gray wardrobe. He has a ruffled wardrobe for all seasons.

The story was good, but the effects and logistics sketchy at best. I settled on a 3.5, and, fortunately for this story, I round up.


Rating: 4/5 – “Would you care for a jelly baby?”


UP NEXT – Doctor Who: Death to the Daleks


The Timestamps Project is an adventure through the televised universe of Doctor Who, story by story, from the beginning of the franchise. For more reviews like this one, please visit the project’s page at Creative Criticality.


Timestamp #69: The Green Death

Doctor Who: The Green Death
(6 episodes, s10e21-e26, 1973)

Timestamp 069 The Green Death


The Doctor and Jo battle corporate fat cats and green slime.

Starting with a closed mine, the workers are waiting for news, but jeer the official who brings them news of money for expansion. As the protest continues, a worker displays a green glow on his skin, and he dies as he sounds the alarm. Back at UNIT, the Doctor is working on the TARDIS as Jo eats breakfast and reads about the mine and Professor Clifford Jones, who has concerns about the corporation and its manipulation of worker health for profit.

In the exchange between our heroes, it seems that Jo is a bit off, but that she and the Doctor are more in sync than they have been. This exchange gets heated as the Brigadier tries to assign the Doctor to the mining case. The Doctor refuses because he wants to take Jo to Metebilis III, but Jo is far more interested in waging an environmentalist battle. The Brigadier and Jo head for the mine, and it’s obvious that the Doctor and Jo are diverging on their philosophical courses. As the Doctor heads to Metebilis III almost in rebellion against Jo’s interests, he is attacked just after landing.

Jo meets Professor Jones, and the man is a bit of an ass who gradually warms to his visitor. His research involves a new high protein fungus, and he’s upset because thousands of gallons of waste, almost like a liquid plastic sludge, are being pumped into the mine. The Brigadier, meanwhile, meets with the corporate executive at Global Chemicals, Mr. Stevens, and offers extra security in light of the protests. He also intends to investigate the mine as soon as the Doctor arrives. The Doctor returns from his trip amid a flurry of attacks and immediately sets out for the mines.

Mr. Stevens orders that no one should go into the mine, but his directive is made through a strange mental haze. In violation of that order, Jo accompanies a miner named Bert down inside the mine to help another infected man, and as the Doctor and the Brigadier arrive to investigate, the cage descends out of control. Bert takes a humorous opportunity to toss Jo around the cage, the Doctor saves them by jamming the mechanism, and Jo and Bert climb down the rest of the way. The miners can free the cage, but they are missing some equipment to to cut the cable. Even though Global Chemicals has the equipment, they claim not to, although a staffer named Mr. Elgin knows differently.

The mental haze from before takes a twist: Mr. Stevens is controlled by a strange disembodied voice which commands his to “process” Mr. Fell, one of the dissenting staff, and that staff member comes back as a near automaton. Resistance is apparently futile.

The Doctor’s investigation reveals that the lift was sabotaged, and he works with Professor Jones to sneak into Global Chemicals and steal the cutting equipment. He is detected by the voice, and intercepted by security guards who are dispatched with Venusian aikido. He is soon trapped by Stevens who, strangely, dismisses the incident after showing the Doctor the empty storage container where the cutting equipment should be. The Brigadier arrives with some cutting equipment that he rounded up by luck, the cable is cut, and the Doctor and a miner enter the shaft.

Bert and Jo explore the mine and find some of the green slime. Bert touches it and is incapacitated, so Jo goes on alone to find help as the Doctor finds Bert and the slime. The Doctor follows Jo, and they both encounter a group of maggots in a large pool of slime who attack as a cave-in begins. They use a mine cart to ford the slime, and climb a crevice to the surface inside the factory. Elgin saves the Doctor and Jo from drowning in the pipe as it fills with sludge, and Fell experiences a conflict between his conscience and the programming, which drives him to commit suicide.

The Brigadier tries to leverage a little government muscle to break open the mystery, but the Prime Minister shuts him down. Later on, the Doctor, Jo, the Brigadier, and Jones are relaxing with a high protein fungus dinner, but the mood is spoiled by word that Bert has died from his exposure. The egg that they retrieved from the shaft hatches, and a maggot creeps up to Jo. Mr. Hinks, the assistant to Stevens, is sent to retrieve the egg, but is attacked by the maggot instead. He quickly dies.

At this point, it’s obvious that Jo and Jones are falling in love. But what of Sgt Benton? Did it not work out with them? Whatever happened, it’s immaterial as she’s totally twitterpated with Jones and his trip to the Amazon, and totally uninterested in the large blue Crystal of Convenience – it later displays a +3 attribute for rolls against brainwashing – that the Doctor brought back from Metebilis III.

The analysis of the slime shows that it works as a virus that changes the victims, and UNIT has orders to seal the mine and limit the spread of the infection. This causes the maggots to escape to the surface, and since bullets and spray don’t work, the Doctor realizes that only a counter-virus will work. Back at Global Chemicals, the Brigadier has sent Captain Yates undercover to find evidence of wrongdoing within the company. That is a great move by the Brigadier, and it demonstrates just how much more dynamic he is in this story than in previous serials.

The Doctor is warned not to return to the corporate offices, so he is forced to don several successive costumes – a move that is very reminiscent of the Second Doctor in The Underwater Menace, The Enemy of the World, and The War Games, just to name a few – to move freely about the compound. Captain Yates provides the Doctor some intel, which the Time Lord follows to the top floor of the factory. The top floor reveals the mystery with a supercomputer called the BOSS, or Biomorphic Organizational Systems Supervisor. It appears that, once again, someone really wanted to spell SHIELD. The Doctor overwhelms the machine with the Liar’s Paradox, but is captured by Stevens who tries to brainwash the Doctor and fails.

On the lovebird front, Jo upsets Jones by accidentally ruining the slides for the slime analysis, so she sets off the find another sample. Her accident turns out to be a critical step toward the cure. He sets off after her and saves her from the grenade barrage that destroys the field of maggots, but he sustains a head injury.

Captain Yates is captured trying to rescue the Doctor. The Doctor escapes, but Yates is brainwashed by the BOSS. The Doctor and Sgt Benton save Jo and Jones, but Jones has been infected by the slime. The Doctor returns to the professor’s lab where he is ambushed by Yates, but the Doctor uses the crystal from Metebelis III to break the brainwashing. The Doctor sends him back in under the guise of still being brainwashed to thrown Stevens off the trail, but that doesn’t work as well as they had hoped. Benton returns to the lab with an empty maggot chrysalis, and they discover another maggot that ate the fungus and died. The Doctor then realizes that the fungus is a cure. They scatter samples all over the area and kill the maggots, but they are stalked by a giant dragonfly, the adult form of the creature. The Doctor defeats it with his overcoat.

Okay, those maggots are downright freaky, with their mouth filled with razor sharp teeth like a langolier.

Captain Yates escapes from the factory and passes word to the Brigadier and the Doctor that the computer is planning something at 4pm that afternoon. The Doctor discovers the cure with Jo’s help and administers it to Jones, and then goes to confront BOSS before the supercomputer links with the other supercomputers around the world. The Doctor reverses Stevens’s brainwashing with the crystal, and Stevens triggers the self-destruct, stopping BOSS permanently.

The voice actor for BOSS, John Dearth, obviously had a lot of fun in the sixth episode with his singing, and the Stevens/BOSS hybrid was a beautiful bit of acting. I was amazed by how well it was performed.

With the crisis stopped, Jo gets engaged to Jones and decides to join the professor on his travels. The professor’s research gets a major UN grant thanks to Jo’s uncle. The Doctor gives Jo the Metebelis crystal as a wedding gift and silently sneaks out with only Jo noticing.

Her days of traveling about time and space are done, and he drives off into the sunset, obviously heartbroken. That ending alone ratcheted up the score for this serial because of the sheer power in so little dialogue.

I’m going to miss Jo Jo.


Rating: 4/5 – “Would you care for a jelly baby?”


UP NEXT – Tenth Series Summary


The Timestamps Project is an adventure through the televised universe of Doctor Who, story by story, from the beginning of the franchise. For more reviews like this one, please visit the project’s page at Creative Criticality.


Timestamp #65: The Three Doctors

Doctor Who: The Three Doctors
(4 episodes, s10e01-e04, 1972-73)

Timestamp 065 The Three Doctors 2


Happy 10th anniversary, Doctor Who! Traditionally, you’d get something made of tin, but the Time Lords are feeling benevolent.

A Pandora’s box arrives in the form of a cosmic ray research module, and it’s hungry because it eats Mr Ollis, the warden of the bird sanctuary where the module crash-landed. Doctor Tyler arrives and takes the box to UNIT where the Doctor analyzes the data, and the Doctor trolls the Brigadier with a silicon rod to stir his tea. As the Doctor and Jo investigate the crash site, the module consumes Doctor Tyler, and a psychedelic cloud leaks out, menaces our heroes, and eats Bessie.

Someone needs a copy of Care and Feeding of Psychedelic Clouds for Dummies.

As if that’s not enough, several cyclopean crab creatures apparate and storm UNIT HQ. The Brigadier leaves Sgt Benton in charge of the lab and leaves to assess the situation, prompting the cloud to arrive and force the Doctor, Jo, and Benton to take refuge in the TARDIS. The TARDIS won’t dematerialize, so the Doctor plays his last resort card and calls the Time Lords.

The TARDIS has been redecorated again, and while I liked the wash basin roundels more, this is still a step up from the wallpaper that dominated the Troughton era. While I was observing that, Sgt Benton was having his “bigger on the inside” moment, which made me laugh.

The Time Lords determine that the attack is stemming from a black hole which bridges into a universe of anti-matter, but they can’t help because the same gateway is siphoning all of their power reserves. Despite the First Law of Time, which forbids the Doctor from doubling back on his own timeline (wait, what?), the Time Lords break the rules and send the Second Doctor to help the Third.

Oh, the irony.

The Second Doctor arrives, heralded by his trademark recorder, and followed by his dislike of the new décor. Sgt Benton is overjoyed, since the last time this saw this Doctor was during the Cyberman invasion. The two Doctors link together telepathically, but can’t get anything accomplished because the “dandy” and the “clown” can’t stop bickering, so the Time Lords call up the First Doctor to set them straight. He can’t come all the way in because of a plot-convenient time eddy that the council cannot overpower, but he passes the word that the black hole is a time breach and that they must cross it.

The Time Lords, by the way, call the First Doctor the “earliest Doctor”: Hartnell’s character was definitively the original.

The Third Doctor decides on a bad plan and rushes out of the TARDIS. Jo follows, and both are consumed. The Second Doctor sees that the cloud has been temporarily satiated, so he and Benton leave the TARDIS to investigate. The Brigadier meets the Second Doctor again, and he jumps to the conclusion that the Third Doctor has regenerated… er, degenerated… er, changed back into the Second Doctor. Bickering and hilarity ensue.

The Second Doctor deduce that the cloud is made of antimatter, and that it was sent by someone powerful since it hasn’t caused a matter-antimatter annihilation. He suggests confusing it with useless information, such as with a television. That’s right, Doctor Who went meta before meta was a thing. While the Second Doctor works that problem, the Third Doctor and Jo wake up on a barren world with the one-eyed crabs, pieces of the laboratory, and Bessie, and they use the car to track a set of footprints to their source.

Back on Earth, the Brigadier wants the Second Doctor to address the Security Council, calling him the Third Doctor’s assistant to sideline the whole regeneration question, much to the Second’s chagrin. The cloud gets the hunger pains again, and the Second Doctor, the Brigadier, and Benton take refuge in the TARDIS. The Brigadier’s “bigger on the inside” moment trumps Benton’s as he accuses the Doctor of building the contraption from UNIT materials and funds. As the Third Doctor and Jo find Doctor Tyler and are subdued by the crab monsters, the Second Doctor works with the First Doctor who suggests letting the cloud attack the TARDIS. When it does, the entire headquarters building is transported into the black hole, which leaves the Brigadier nearly apoplectic. He goes off to call in this new development as the Second Doctor and Benton find Mr. Ollis, and then get captured by the crabs.

We also note that the TARDIS is just a prop thanks to a camera angle that peers all the way inside.

And then we meet the architect of this whole thing: The legendary long lost Time Lord named Omega. He was the solar engineer who created the supernova that powers Time Lord civilization, but was supposedly killed in the resulting explosion. In reality, he was transported to the antimatter universe, where his will and thought turned the formless matter into physical form. It’s also his cage, since his will is the only thing maintaining reality, and he vowed revenge on the Time Lords who left him stranded. Omega deduces that the Second Doctor and the Third Doctor are the same Time Lord, and boy is he angry. He places them in a cell pending execution, and they continue bickering before the companions put them in their place. I loved that!

Omega has control of the singularity, which grants him immense power, and Jo considers that the Doctor must also have some potential in this universe. The two Doctor will a door into existence, they all escape the cell, the companions get lost and escape the palace, and the Doctors get discovered by Omega in the singularity chamber, where Omega challenges the Third Doctor to a mental Thunderdome. The Third Doctor is defeated, but the Second reasons with Omega using the imprisoned Time Lord’s freedom as leverage.

The Time Lords send the First Doctor into the black hole, reasoning that together they are powerful enough to defeat Omega. The Second Doctor laments his lost recorder (foreshadowing!), but deliberately angers Omega to challenge the villain’s self control. The two Doctors reason that if Omega can transport matter to Earth on the light stream, he could transmit himself as well, but Omega reveals that he is a prisoner of his own design. If tries to leave, he loses control over the construct, and if he stops controlling the construct, he cannot leave. He brought the Doctor(s) to become the new caretakers. As he prepares to leave, however, he discovers that he no longer exists in a form that can survive outside of the antimatter construct. Omega is powered only by his will to live, and that only works on this side of the mirror. He goes all Kylo Ren on everything since he does not want to live like that, and the Doctor run back to the TARDIS just in time to let all of the companions seek shelter.

The First Doctor is unable to fully appear in the antimatter universe since the Time Lords’ power is so badly compromised, but he links with his successors and formulate a plan. They ask Omega to bring the TARDIS to him, and then ask the companions to trust them implicitly. They promise to set Omega free only if he sends the companions home, and Omega counters that he cannot be freed, but will keep the Doctors as his companions. Each of the Doctors’ companions step into the light stream and go home.

As much as I tear into the Brigadier’s character, he did have a very touching moment as he saluted the Doctors. He truly believes it to be the last time that he shall see them.

The Doctors offer Omega the TARDIS’s force field generator as a means to escape, but he physically rejects it, and the Second Doctor’s recorder (which has been on the TARDIS inside the generator the entire time and not modified to exist in both universes) annihilates with the anti-matter in a supernova, breaking the bridge and returning everyone to their rightful places. Poetically, the act also restores power to the Time Lords, making it the second time that Omega has exchanged his life for their civilization.

In exchange for his help, the Time Lords forgive the Doctor of his crimes: After fifteen serials in exile, they return his knowledge of time travel and provide him with a new dematerialization circuit. Jo is elated, since the Doctor decides that he can’t leave Earth yet since he needs a new force field generator.

Thank the Maker, we get time travel again!

Overall, this was a great story, and it was fantastic to see Troughton back in action. His madcap style is a great contrast to Pertwee’s pompous prim and proper. It was also good to see how well the companions and Doctors all interacted, although it would have been nice to bring in some of the First and Second Doctor’s companions as well. Time and budget are always constraints, and it might have also muddied the plot a little.

One place where I’m torn is with Hartnell’s final performance. It was so good to see him in character again, but he was obviously very ill and not fully back to where he left the character thirty-six serials ago. Sadly, he died two years after this performance, his last as the Doctor and his final acting performance overall.


Rating: 5/5 – “Fantastic!”


UP NEXT – Doctor Who: Carnival of Monsters


The Timestamps Project is an adventure through the televised universe of Doctor Who, story by story, from the beginning of the franchise. For more reviews like this one, please visit the project’s page at Creative Criticality.


Timestamp #64: The Time Monster

Doctor Who: The Time Monster
(6 episodes, s09e21-e26, 1972)

Timestamp 064 The Time Monster


The Doctor has some weird dreams.

Foreshadowing events to come over the next three hours, he has a nightmare about the Master and trident-shaped crystal, which is (1) a bit on the nose symbolically since it comes from Atlantis, and (2) exactly what the Master happens to be holding in his guise of a science professor. Of course, this is the third time Doctor Who has tapped on the Atlantis mythos, and I’m sure it won’t be the last.

The Doctor is concerned about his nightmare, and he tells the Brigadier (who has been laying low since the Daleks waged gorilla on guerilla warfare) to alert UNIT to be on the lookout for the Master. The Brigadier does so sarcastically, and then reminds the Doctor that UNIT is obligated to attend the demonstration of TOMTIT – a project that demonstrates Transmission of Matter Through Interstitial Time and the Master’s desire to spell something silly – but since the Doctor and Jo are waiting for the Master to strike and Captain Yates has the duty, poor Sergeant Benton is ordered to cancel his leave and join the Brigadier at the Newton Institute.

What the Doctor doesn’t realize is that leave is one of the most precious commodities in the world to an enlisted man. I’m not saying that he should watch his back from this point forward, but maybe he should start carrying a rear-view mirror everywhere he goes.

Instead of requisitioning a rear-view mirror, the Doctor builds a time sensor – a TARDIS “sniffer-outer” – that starts going ballistic when the TOMTIT scientists start a rehearsal of the experiment. That Master gets angry that the team started early, but Dr. Ruth Ingram points out that the experiment overloaded its circuits during the teleportation, and the Master determines that the crystal is drawing energy from outside time itself. He decides to skip the traditional post-demonstration wine-and-dine when he sees UNIT arrive for the show.

The Doctor and Jo track the source of the temporal readings in Bessie, which now has a Super Pursuit Mode sans absurd transforming sentient Trans-Am, and we also start seeing the depths of the Doctor’s obsession with Venus. He has programmed the time sensor to read in Venusian miles, requiring a conversion table for each calculation. The sensor spikes as the Master, cleverly disguised in a radiation suit, begins the experiment which turns out to be a front to summon a being called Kronos.

The experiment creates bubbles of time dilation, and when the Doctor arrives, he is slowed down and Jo is frozen. Stuart, the research assistant, has aged sixty years due to radiation exposure as his own personal temporal reference has been accelerated. Dr. Ingram – call her Ruth – mentions Professor Thascalos, and the Doctor’s mastery of Greek uncovers the Master’s identity. The Brigadier orders support troops, the Doctor’s TARDIS, and an evacuation of non-essential personnel from the Institute, and the Doctor investigates the crystal at the heart of TOMTIT. Kronos is a fearsome member of the Chronovore race who live outside of and eat time, and the mythology is an interpretation of actual events. The crystal is the same one that summoned Kronos to Atlantis thousands of years ago, and the rest of it is located in the Vault of Poseidon, deep in the legendary city thousands of years in the past.

The Master’s TARDIS is disguised as a computer in the laboratory, and to get to it, he tricks Benton into leaving the laboratory. Benton sees through the ruse, but gets knocked out upon ambushing the Master. The Master summons an Atlantean priest named Krasis, and the priest possesses a holy seal that contains the secret of summoning Kronos. With all the keys in place, the Master summons Kronos. The mighty creature eats the institute’s director as Stuart de-ages and the Brigadier, Benton, and Ruth get trapped by the temporal field. Kronos proves to be uncontrollable, and the Master returns it to the crystal.

The Doctor makes a temporal jamming device, but it doesn’t last long. As Captain Yates and UNIT arrive, the Master summons opposition from the past in the form of a medieval knight, a squad of Roundheads, and a V1 bomb. The V1 takes out the convoy but everyone is okay, and as Ruth, Stuart, and Benton go to the lab to take on the Master, the Doctor and Jo take to the TARDIS.

The TARDIS has a new desktop – the wash basin roundels are a nice touch – and the Doctor develops a plan to materialize his TARDIS inside the Master’s TARDIS. This concept of a TARDIS inside a TARDIS boggles the mind, but it’s possible. Really tricky, but possible. If the calculations aren’t precise, a time ram will occur that will annihilate both of them.

Jo’s bravery and spunk motivate the Doctor, and the TARDIS lands. The two are linked as the Master’s TARDIS appears to materialize inside the Doctor’s. When he leaves, his TARDIS is inside the Master’s. They leave the Master’s and emerge into the Doctor’s. They are both inside each other, creating a time loop.

When the UNIT troops arrive – Krasis’s temporal ignorance is a fantastic alarm system – and the Master extends a time field to prevent them from interfering. The duo take off for Atlantis, and since the TARDISes are linked, the Doctor and Jo go with him. Meanwhile, Ruth, Stuart, and Benton are trapped in the lab, and they work to deactivate the time field and rescue the Brigadier’s squad. The plan backfires, and Benton gets turned into a baby.

After a sequence that helps develop the franchise’s basis for the TARDIS’s telepathy and language interpretation skills, the Doctor is forced to leave his TARDIS to confront the Master. The Master summons Kronos, which eats the Doctor (setting him adrift in the time vortex) before returning to the crystal. The Master then ejects the Doctor’s TARDIS into the time vortex. After the turbulence, Jo comes to and hears several whispers from the Doctor, but a single, strong voice comes through clearly via the TARDIS. The TARDIS and the Doctor work with Jo to rescue the Time Lord before setting course for Atlantis.

In the legendary lost city, King Dalios holds court, and rabble-rouser Hippias wishes for a return to the glory during the era of Kronos. Dalios attempts to dissuade them, but the Master interrupts him with a grand entry and claims to be an envoy of the gods. When Krasis claims to have seen Kronos, Dalios takes him and the Master into private conference. The Doctor arrives shortly thereafter, and Krasis attempts to kill him but Hippias intervenes. The Doctor and Jo are taken to Dalios instead.

The Master is dismissed after failing to place Dalios under his thrall, and he’s surprised to see the Doctor alive. The Doctor and “Jo Jo Grant” meet with Dalios, and the king sends Jo to meet with his queen, Galleia. Later on, Galleia meets with the Master, who offers him the crystal. Jo attempts to inform the king and the Doctor, but she is turned away. She pursues Hippias, who is tasked with retrieving the crystal for Galleia, but is captured by Krasis and locked in with the crystal’s guardian, the Minotaur.

The Doctor finds out about Jo and goes after her. Hippias tries to save Jo, but the Minotaur kills him, and the Doctor does his best olé by bullfighting the guardian into a wall. As the wall crumbles, the crystal chamber is exposed, and Krasis takes the Doctor and Jo to see the king. Unfortunately, the king has been deposed thanks to Galleia and replaced by the Master. He imprisons the Doctor and Jo, and after the Doctor relates a tale about the blackest day of his life. Behind his home on a mountain was a hermit (a monk, but not The Monk) who spent half his life under a tree. The hermit listened to the Doctor’s woes, and then pointed to a flower, which presented the Doctor a new perspective on life. Afterward, Dalios is imprisoned in the same cell, shares his vision of the Doctor saving Atlantis, and then dies.

Later on, Galleia addresses Atlantis and presents the Master as king, and he offers to summon Kronos. The Doctor reveals to Galleia that Dalios is dead, and she turns on the Master. Kronos is summoned and the Master orders it to destroy Atlantis. The Master escapes with the crystal, but Jo pursues him into his TARDIS. The Doctor chases after them in his TARDIS and threatens the Master with a time ram. The Master calls the Doctor’s bluff, and Jo initiates the time ram, catapulting both TARDISes into a featureless place. They are greeted by Kronos, who was released when the TARDISes collided. She grants the Doctor and Jo a reward for their assistance, and they ask to be returned home. She intends to keep the Master in torment and punishment, but the Doctor asks for leniency. Of course, the Master takes the opportunity to escape.

With the universe saved once again, the Doctor and Jo return to Cambridge as the time field is released and the TOMTIT device explodes. Everything is back to normal, the Brigadier acts as comic relief, and Benton returns to adult form in his vintage birthday suit.

The Doctor might really want to consider that rear view mirror.

This was a pretty good serial, but not quite up to the bar set by the rest of the season. It was certainly fun, but it’s kind of hard to follow The Mutants.

I appreciated that the writers hung a lampshade on the TOMTIT acronym: Almost every time it was mentioned, one of the companions would do a double take, and it’s understandable. The device looks nothing like a small bird or a biplane, and between this and the rather unfortunate shape of the time sensor, I think the creative team was having some fun with this one.

I also liked the symmetry of the Master and the Doctor simultaneously working the overload problem in separate locations. These frenemies (hey, the word’s been around since the 1950s) are really not that different if you strip away their motivations, and if the Master could get over his self-sabotaging need to have his plans overpower him, he’d be nearly unstoppable. I also liked how the Master didn’t engage the TARDIS’s chameleon circuit when he traveled to Atlantis. It added to the shock and awe of seeing a foreign object materialize from thin air.

I enjoyed the humor behind the Doctor showing up the Brigadier and his disdain of Bessie with the car’s super drive. I also liked seeing Dave “Darth Vader” Prowse in something other than Star Wars.

Overall, this was a great story that was perhaps a bit long, and even judged on its own merits is the weakest part of an otherwise spectacular season.


Rating: 4/5 – “Would you care for a jelly baby?”


UP NEXT – Ninth Series Summary


The Timestamps Project is an adventure through the televised universe of Doctor Who, story by story, from the beginning of the franchise. For more reviews like this one, please visit the project’s page at Creative Criticality.


Timestamp #60: Day of the Daleks

Doctor Who: Day of the Daleks
(4 episodes, s09e01-e04, 1972)

Timestamp 060 Day of the Daleks


The Daleks are back, and they seem to have recovered from the Second Doctor’s confrontation with the Emperor Dalek so long ago.

I really loved this story because of how it is framed. What starts as a simple UNIT investigation of a diplomat being stalked by strange ghost-like guerrillas ends up being much deeper than many of the stories from the last set.

Sir Reginald gets attacked by a strange human warrior with a gun who vanishes without a trace, almost like a ghost. Another guerrilla appears from thin air and is instantly attacked by an ape-like creature in an act of gorilla on guerrilla warfare. (Okay, that was a bit insensitive.) And then, as if we needed more conflict, the Daleks enter the stage, and even though they aren’t front and center in this story, they’re still menacing and sinister because they’re pulling all of the strings on all of these puppets.

All of this before we even get to the time travel, and I was riveted.

And then the creative team turned this exploration of the human condition up to eleven.

After spending a night at Sir Reginald’s house (and raiding his extensive wine cellar), the Doctor and Jo are attacked by the guerrillas and held hostage. Jo escapes and is inadvertently transported to the future. She innocently tells the Controller where to find the Doctor, and the Controller sends a team of Ogrons (the ape-like creatures) to kill the guerrillas. The guerrillas escape, the Doctor gives chase, a Dalek chases all of them, and the Doctor and the rebels end up in the future. After a series of political ping-pong events, the Doctor ends up in the care of the Controller, gets the down-low on what happened to the planet, and eventually sways the Controller’s attitudes on the peril of humanity and his role in a lineage of “Quislings“.

As events come together like a jigsaw puzzle, the Doctor discovers that these events are a predestination paradox started by one of the rebel guerrillas setting a Dalekanium bomb in an attempt to stop the future of enslavement and death from coming to pass. At that point, my jaw dropped.

This. Is. Doctor Who.

It’s hard to find highlights here because the whole story shines so brightly: I loved how the Doctor was so much more civil with the Brigadier than in past interactions, including their building trust and synergy (“do tell the Marines”); I adored the (hopefully budding) relationship between Sgt Benton and Jo; I enjoyed watching Jo finally expanding her horizons and learning to be a worthy companion for this Doctor.

The Doctor is still working on the TARDIS, and his new-found civility extends to Jo as he frankly tells her that he doesn’t want to be an intergalactic puppet for the Time Lords and their High Council. He’s moving beyond his childish temper tantrums and taking action with what appears to be a new sense of purpose. Ironically, it was the Time Lords who provided it by allowing the Doctor and Jo to travel in the TARDIS once again.

The quick (almost non-sequitur) time loop a the beginning was fascinating, especially since the recent incarnations of the Doctor are very cautious about crossing their own timelines. This thread is never mentioned again in the story and left me wondering why it was important.

On the downside for this serial, the Doctor uses a gun to kill an Ogron. Sure it was self-defense, but it was also way out of character.

I also questioned the role of the Ogrons. I mean, yes, they make great hired muscle, but isn’t it uncharacteristic for the xenophobic Daleks to even consider working with them? Or is this more of a “use them then lose them” plan like the alliance in The Daleks’ Master Plan? Speaking of the Daleks, they discovered the secret of  time travel for this story, but hadn’t they done this before?

On the new sound for the Dalek death rays, I don’t like it.

Finally, swinging back to the good things, it was nice to see that The Daleks don’t recognize the Doctor’s new face. They know that he has changed appearance before and use a mind analysis machine to determine if he is indeed the Doctor, but it took an extra step to establish that logic. Thank goodness.


Rating: 5/5 – “Fantastic!”


UP NEXT – Doctor Who: The Curse of Peladon


The Timestamps Project is an adventure through the televised universe of Doctor Who, story by story, from the beginning of the franchise. For more reviews like this one, please visit the project’s page at Creative Criticality.


Timestamp #59: The Dæmons

Doctor Who: The Dæmons
(5 episodes, s08e21-e25, 1971)

Timestamp 059 The Dæmons


It was a dark and stormy night, almost the setting for a Doctor Who Halloween Special, but aired in early summer.

Professor Horner and his team are excavating a site called Devil’s Hump, and they are surrounded by a series of events that are like magic. The local village witch, Olive Hawthorne, comes out to protest but is ignored, so she returns home and goes to visit the vicar, a new man named Mr. Magister, who is really the Master. Also, she’s immune to his hypnotic powers, unlike everyone else in the town.

Turns out, the Master is attempting to summon a demon. Well, a race of demons. Well, really an alien race that looks like demons that are kind of like scientists that run experiments on civilizations. They’ve been on the planet for 100,000 years, and when the experiments are deemed successful, they spark a technological revolution. When the experiments fail, you get Atlantis.

Anyway, this serial is an exercise in Arthur C. Clarke’s third law of prediction: “Any sufficiently advanced technology is indistinguishable from magic.” The Dæmons have been around for so long that they’ve been worked into our mythology, and when they appear/disappear, it requires a conversion between energy and matter. That energy release when they shrink resulted in a shield dome being constructed around the village. The Doctor helps UNIT cut a hole in it so they can keep the gargoyle Bok busy while the Doctor attends to the larger Dæmon named Azal. The Master and the Doctor negotiate with Azal as to who will serve it best, and it sides with the Master. Jo offers to sacrifice herself to prevent Azal from killing the Doctor, and that somehow short circuits Azal’s brain. Azal explodes, the Master is finally captured by UNIT, the Doctor and Jo dance around the maypole, la fin.

It was an interesting idea, but it felt poorly executed, and I think a lot of that is because of the sensitivity at the time regarding demons and the supernatural on the BBC. This story could be done now and not feel so awkward or ham-fisted, but I think the prevailing culture crippled the story’s potential.

There were some good points, like the realistic special effects (the helicopter shot, originally sourced from From Russia with Love, and the church explosion) and the continuing thread of the Master biting off more than he can chew, but then there were also some really bad points, such as the resolution. The threat was stopped by accident, and if Jo hadn’t been there, the Doctor would have failed to stop the Master from taking over the world. Similarly, the Master was captured by Sgt Benton’s good timing.

This story also has a few potential links to the future of Doctor Who. First, Bok is apparently made of stone. Are the Dæmons precursors or ancestors to the Weeping Angels? Second, the UNIT sergeant who builds the force field defeating contraption is named Osgood. Is he related to the current personal assistant at UNIT who saved the world? Both of them are scientists and they both wear thick-rimmed glasses.

The Master offered the villagers anything they wanted for the price of their servitude, and I heard echoes of Needful Things.

Finally, UNIT needs to stop shooting things. It hardly ever works.


Rating: 2/5 – “Mm? What’s that, my boy?”


UP NEXT – Series Eight Summary


The Timestamps Project is an adventure through the televised universe of Doctor Who, story by story, from the beginning of the franchise. For more reviews like this one, please visit the project’s page at Creative Criticality.