Timestamp #194: Time Crash & Voyage of the Damned

Doctor Who: Time Crash
Doctor Who: Voyage of the Damned
(Children in Need and Christmas Specials, 2007)

When you look deep into the pockets of the universe, you never know what you find.

Time Crash

Immediately after Martha left the TARDIS and the Doctor once again took flight, the blue box goes haywire. The Doctor stabilizes the time capsule, but he finds himself face-to-face with the Fifth Doctor. The Fifth Doctor is confused but the Tenth Doctor is amused, getting nostalgic about the frowny face, the hat, the coat, the crickety-cricket outfit, the brainy specs, and even the decorative vegetable on his lapel.

The Fifth Doctor is beside himself, but his frustration is interrupted by a warning that two TARDISes have merged and have the potential to blow a hole in the space-time continuum the size of Belgium. The Fifth Doctor thinks that the Tenth Doctor is a fan, possibly from LINDA. The Tenth offers the Fifth a sonic screwdriver but remembers that he went hands-free at this point in his lives.

At the moment of Belgium, the Doctors initiate a supernova and a black hole at the same time and separate their capsules. The Tenth works to send his predecessor home, curious if Nyssa and Tegan were with him, or whether he has encountered the Cybermen, the Mara, or the Master yet. The Tenth Doctor admits that he just faced the Master, prompting the Fifth to ask about “that rubbish beard.” The Tenth replies that the beard is gone, replaced by a wife.

Oh, Steven Moffat and his jokes about homosexuality.

As the Fifth Doctor returns his time, the Tenth takes a moment to say goodbye. After all, the Fifth Doctor was his Doctor.

The moment is broken when a ship crashes through the TARDIS walls.

Her name is Titanic.

Voyage of the Damned

The Doctor uses the TARDIS console to regenerate the capsule’s walls and materialize aboard the cruise liner. He finds a Christmas party in full swing, complete with aliens and seemingly robotic angels, as the starliner Titanic settles into orbit with the planet Earth spinning around below.

The ship’s captain offers his stalwart crew a tot of rum to celebrate the holiday. The bridge crew leaves except for a midshipman who quotes regulation to the captain, and he’s allowed to stay behind.

The Titanic is a Max Capricorn cruiseliner, which the tuxedo-clad Doctor discovers as he views a promotional ad before rejoining the party. He finds that the robotic angels, the Host, are the shipboard information system. The ship was named after the most famous vessel of the planet Earth and is en route from Sto to observe the human holiday. The angel short circuits and is taken below to the engineering section with all of the other malfunctioning robots.

Among all the lovers in the room, the Doctor meets Astrid Peth, a member of the ship’s staff who accidentally drops a drink tray. She wants to travel like the Doctor, and realizing that it’s never too late, he reveals himself as a stowaway. She’s impressed – almost like love at first sight – and offers a drink instead of reporting him. The Doctor joins a table with Morvin and Foon Van Hoff, a couple in sparkly Western-style dress who are being mocked by the black-tie guests. The Doctor uses the sonic screwdriver to pop a champagne bottle and douse the bullies before joining the Van Hoffs for a trip to the planet below. En route, he spins Astrid around and brings her along. After a poorly researched historical brief, the party is joined by a small spiky red-skinned alien before they all transmat down to a deserted city.

The Doctor is perplexed: London should be bustling with people, but there’s not a soul in sight.

He asks Wilfred Mott, a newsstand operator, where everyone is on a night like this. He points to the last two Christmas invasions as examples that drove people to flee the city just in case. Better the devil you know, right? The Doctor and Astrid are beamed back up, mid-sentence, due to irregular power fluctuations on the ship. The Doctor is intrigued.

Meanwhile, the captain has magnetized the hull to draw in nearby passing meteors. The midshipman is perplexed. The Doctor discovers that the shields are down and tries to warn the bridge, but he’s ignored and apprehended. He tries to warn the passengers but is taken away. The captain also shoots the midshipman to prevent him from stopping events. He has been extorted in some way.

The passengers start to come around but everyone is too late to stop the collision. The ship is struck on the starboard side and mayhem erupts. As the Host come back to life in engineering, the Doctor notes that the chaos has stopped for the time being. He also remarks that Titanic is a bad name for a ship and that his tuxedo is awfully unlucky.

One of the crew inadvertently causes a hull breach but the Doctor re-enables the oxygen shield. He also watches as the TARDIS drifts by. Luckily, it locks on to the nearest planet and flies into the blue. Unfortunately, they can’t reach it.

Another bit of bad luck? The Host are now programmed to kill.

The Doctor makes contact with the bridge and Midshipman Frame. They discover that the storm drive engines are spooling down. If ship loses locomotion and plummets into the planet, it will cause a nuclear explosion and a planetwide extinction event. The ship is a timebomb.

The Doctor – “I’m the Doctor. I’m a Time Lord. I’m from the planet Gallifrey in the constellation of Kasterborous. I’m nine hundred and three years old and I’m the man who’s going to save your lives and all six billion people on the planet below. You got a problem with that?” – believes that it’s never too late and asks the survivors to confide in him. He takes charge and rallies them to both escape and save the planet. Astrid really believes in him.

As they move through the ship, Mr. Copper, the historian, keeps getting information about the planet below all wrong. They discover a disabled Host and the Van Hoffs (who are robotics experts) start trying to fix it. Meanwhile, Bannakaffalatta (the small red alien who is really a cyborg) scouts ahead through the wreckage as Astrid and the impossible Rickston Slade try to move enough wreckage to get everyone through. Astrid and Bannakaffalatta develop a special relationship as they go.

Midshipman Frame discovers that the Host are corrupted after they kill survivors in the galley. He warns the Doctor just as the Van Hoffs fix their disabled robot. The group of survivors rush to safety, learning on the way that the Host are being controlled from Deck 31. The Host assault the bridge, forcing Frame to deadlock the hatches and seal himself in without escape.

The survivors take a meal break while they have a chance. The Doctor and Astrid continue building their relationship while Copper reveals that he lied to get his job. The Host banging on a nearby bulkhead force the survivors to press forward, but that leads them to the space above the nuclear engines. The space between bulkheads is spanned by a narrow bridge, and as Morvin declares that he and Foon will go last, the deck gives way and he plummets to his doom. Astrid comforts Foon as Slade crawls across the bridge.

Bannakaffalatta goes next, followed by Astrid and Copper. Foon refuses to cross and the Doctor promises to come back for her. The Host stops banging on the bulkheads, but only because they take flight and start using their halos as deadly discuses. Bannakaffalatta reveals his nature to the survivors with an electromagnetic pulse, disabling the Host but giving his life in the process.

Copper salvages the electromagnetic transmitter as a remaining Host rises. The Doctor stumbles onto a security override that allows him three questions, so he learns that the Host have been instructed by their leader to kill the survivors. The Host raises its halo to strike but Foon wraps it in a rope and jumps over the side, sacrificing herself for the group.

Vowing that no more shall die tonight, the Doctor sets everyone to work. Astrid makes her case to join him on the TARDIS and he agrees that it would be wonderful to have her step back in time with him. He sends the survivors with the EMP unit and his sonic screwdriver, and with a kiss from Astrid, he rushes down to Deck 31.

Astrid, Copper, and Slade successfully defeat a group of the Host while the Doctor reveals himself as a stowaway and negotiates his arrest. The survivors make it back to the ballroom and while Copper and Slade work on the distress signal, Astrid convinces Frame to give her enough power to transmat to Deck 31 and help the Doctor.

The Doctor arrives on Deck 31 and meets the ultimate authority behind the night’s events: Max Capricorn. Or rather, the disembodied head on a rolling robotic life-support system, running the company by hologram in a culture that distrusts cyborgs. Capricorn is angry that the ship hasn’t crashed yet, and the Doctor takes the time to unravel the plan. Capricorn’s company has failed and he has been pushed out by the board, so if the Titanic destroys the Earth, he gets revenge as the board gets jailed for murder. Capricorn will survive in a special chamber and live out his life far away.

Capricorn reveals that he can remotely shut down the engines, forcing the Titanic to crash. As Capricorn orders the Doctor’s execution, Astrid rushes in with a forklift and drives Capricorn’s robotic body over the side into the engine below. The Doctor, begging inside for just a little more time, watches as she falls to her death.

The resolute Time Lord declares himself as the next highest authority on the ship and orders the Host take him straight to the bridge. They burst through the deck and the Doctor takes the helm from Midshipman Alonso Frame, steering the ship straight into the atmosphere. He calls up Buckingham Palace, ordering the Queen and her corgis to evacuate just in case his calculations are off. On the street below, Wilfred screams at the sky.

The Titanic barely misses the palace (but gets a Christmas greeting from the Queen) and sails into the sky, using the heat of re-entry to restart the auxiliary engines. The Doctor did it again.

He has an epiphany and tries to use the teleport bracelets to restore Astrid using their safety protocol. He’s only partially successful due to the damage in the system, bringing her back as only a fragment of her former self. The Doctor apologizes and kisses her in a bittersweet goodbye before opening a porthole and sending her atoms to fly among the stars forever.

Frame, Copper, and Slade, the only survivors of the starliner Titanic say their farewells to the Doctor. Copper offhandedly remarks that, if someone could decide who lives and who dies, it would make them a monster. The Doctor hands him a bracelet and they teleport to the surface. The Doctor refuses Copper’s request to travel with him, but he does explain that the credit card that Copper carries for Earth incidentals makes him a millionaire.

Copper dances away with the promise he will make the Doctor proud… and that he will always remember Astrid.

The episode closes on a dedication to Verity Lambert, OBE. She was the first producer of Doctor Who, and she died a month before this story was originally aired.

Both of these episodes were pure fun. Starting with Time Crash, we get the first multi-Doctor story of the revival era as well as the first time a classic-era Doctor’s actor was in the opening credits. It was directed by Graeme Harper, whose first credited directorial work in Doctor Who was Peter Davison’s last story.

It’s a better two-Doctor story than The Two Doctors, but that’s not hard to do.

It also marks the return of Steven Moffat to Doctor Who, a name we will see one more time in the Tennant era. The Curse of Fatal Death, The Empty Child/The Doctor Dances, The Girl in the Fireplace, Blink, and this small story are leading to bigger adventures for him in the coming years.

Moving to Voyage of the Damned, we get a rollicking adventure with a celebrity guest star as a one-shot companion. Kylie Minogue is magnetic in this story and it’s a shame that we didn’t get the chance to see her as a regular. She did a magnificent job in driving the contrast between the lonely Time Lord and one who travels with companions. She also indirectly proved the points that the Doctor is not a god and that he is not infallible.

The Host look very similar to the Axons and the Capricorn cyborg is reminiscent of Davros. We also get a couple of cameos with singer Yamit Mamo (including original song “The Stowaway“) and BBC journalist Nicholas Witchell. If you look closely at the Titanic‘s band, you’ll also note Murray Gold and Ben Foster.

The big drawback to this episode was the overuse of the Hans Gruber moment. The slow-motion shot of someone falling while looking up towards the camera happened four times – the steward, Foon, Morvin, and Astrid’s respective deaths – and that count is bordering on comical.

Regardless, this pair of stories was an entertaining adventure and a fantastic lead-in to Series Four.

Rating: 5/5 – “Fantastic!”

UP NEXT – Torchwood: Kiss Kiss, Bang Bang

The Timestamps Project is an adventure through the televised universe of Doctor Who, story by story, from the beginning of the franchise. For more reviews like this one, please visit the project’s page at Creative Criticality.

Advertisement

Timestamp: Sarah Jane Adventures Series One Summary

Sarah Jane Adventures: Series One Summary


This was a pleasant surprise.

I mean, yes, the headline is Elisabeth Sladen reviving her iconic role as Sarah Jane Smith, one of my absolute favorite companions in Doctor Who. But I have also seen so many franchises falter when trying to cater to a younger crowd. All too often they water down the property to make it more – shall we say? – palatable for children, and that tends to carve away the support structure. Everything that made the material strong gets lost in an attempt to gain more eyes.

It’s insulting, really. It’s almost as if creators are asking children not to think or analyze, but just consume.

The Sarah Jane Adventures did not do that. It tackled issues important younger audiences – who could readily identify with the stars of the show – while not pulling any punches with the Doctor Who style. It was refreshing for the genre.

The characters are strong overall, and while I fault the BBC for removing Kelsey Hooper because they thought that there were too many women on the show, Clyde Langer is a decent enough replacement. I’m really enjoying the mentoring relationship between Maria and Sarah Jane, and the evolution of Sarah Jane Smith as she builds a family on Bannerman Road is beautiful.

(Other sources claim that Porsha Lawrence-Mavour was fired due to being rude and difficult to work with, but I haven’t seen anything definitive on that.)

When I was coming up to this show in the Timestamps Project, Michael French of Retroblasting told me that he enjoyed it. That was a strong endorsement, and it’s one that I agree with. I’m also glad that he didn’t spoil the big twist with Mr. Smith because that was fun to watch without knowing about it beforehand.

Series One comes in at an average of 4.3. In comparison to Doctor Who, that’s on par with Series One and Series Three near the top of the stack. This series easily beats the first series of Torchwood.

Invasion of the Bane – 5
Revenge of the Slitheen – 4
Eye of the Gorgon – 3
Warriors of Kudlak – 4
Whatever Happened to Sarah Jane? – 5
The Lost Boy – 5

Sarah Jane Adventures Series One Average Rating: 4.3/5


From here, the path for the Timestamps Project continues on a mostly airdate order. Next up is Time Crash and Voyage of the Damned, followed by the second series of Torchwood and Series Four of Doctor Who.

We’re also on the verge of the holiday season, so Timestamp releases may take a break here and there over the next month or so. Keep an eye on the Facebook page for the most up to date scheduling info.


UP NEXT – Doctor Who: Time Crash & Doctor Who: Voyage of the Damned


The Timestamps Project is an adventure through the televised universe of Doctor Who, story by story, from the beginning of the franchise. For more reviews like this one, please visit the project’s page at Creative Criticality.

Timestamp #SJA6: The Lost Boy

Sarah Jane Adventures: The Lost Boy
(2 episodes, s01e06, 2007)


Mr. Smith, the planet needs you.

After Alan Jackson discovered the truth about the Bannerman Road Gang, he and Maria discuss her adventures. He decides to keep it all secret by putting the house on the market and moving away. Across the street, Sarah Jane and Luke are stargazing when Maria breaks the news. Alan joins the conversation and eventually realizes that staying is the best option for his family. The group watches the Kalazian Lights fly through the night sky.

The next day, the group is startled by a televised press conference about a missing child who looks just like Luke and was last seen boarding the Bubble Shock bus. Sarah Jane has Mr. Smith scan Luke to determine reality and the supercomputer declares that Luke is the missing boy, Ashley Stafford. The lack of bellybutton is credited to the Bane, an egg-born species, being offended by its presence.

Chrissie Jackson calls the police and Sarah Jane reluctantly turns Luke over. The neighborhood watches as Ashley’s parents arrive. Tensions rise – Chrissie gloats at the drama she’s created – and Sarah Jane is taken into custody. She is later released, thanks to UNIT.

Luke is taken to his new home but as trouble fitting in with the expected lifestyle. He’s also dismayed that he’s locked into his room at night. Jay and Heidi Stafford contact a character named Xylok through their television, reporting that they have him in custody. Luke is also prohibited from seeing his friends or even attending school again.

Maria tries to console Sarah Jane but she’s convinced that the only path forward is to dissolve the Bannerman Road Gang, suggesting that Maria should move away. Sarah Jane holes up in the attic and Mr. Smith suggests that she needs a purpose. He points her toward the Pharos Institute, a research center where alien technology is being used to conduct experiments into telekinesis. There she meets an annoying child prodigy named Nathan Goss.

Clyde and Maria decide to skip school to see Luke. Maria is stopped by a teacher, but Clyde is able to sneak out. Unfortunately, Heidi refuses to let him in. She also claims that Ashley is a great skateboarder, which Clyde knows to be a lie. After Clyde leaves, Nathan arrives and tells the supposed parents that they have a problem. Luke tries to escape and is stopped. He learns the truth about his captors: They are the Slitheen from their failed revenge attempt, this time with improved skin suits.

Sarah Jane is directed by Mr. Smith to return to Pharos and steal one of the telekinetic headsets. After she leaves, Clyde heads to the attic and asks Mr. Smith to analyze a photo of Ashley and his parents. Mr. Smith reveals that he is the Xylok and that he faked the photo. He digitizes Clyde, TRON-style, and stores the boy in his memory banks with a fiendish laugh.

I didn’t see that twist coming.

Sarah Jane sneaks into Pharos with her sonic lipstick. She swipes the headset, which triggers an alarm, but escapes with secret agent flair.

Clyde wakes up inside the supercomputer. He watches as Sarah Jane turns the headset over to Mr. Smith and tries to figure out how to make contact. Meanwhile, Maria desperately tries to find Clyde. Alan decides to accompany Maria to the Stafford residence. When they find no one home, they decide to break in. Alan stumbles across a skin suit and Maria discovers what’s going on. They return home to find Chrissie and Maria sneaks away to tell Sarah Jane about the threat.

Clyde uses the internet to warn Alan through his laptop. Alan rushes to tell Sarah Jane just as Mr. Smith reveals himself and tries to kill Alan, Maria, and Sarah Jane. The humans escape and retreat to the Jackson house. Mr. Smith incapacitates Clyde as a result.

Sarah Jane tells the Jacksons about a crystal that she was sent from the Krakatoa volcanic eruption. It turned out to be a Xylok memory crystal, and Sarah Jane used it to build a supercomputer. She puts the pieces together that the Slitheen plan to harvest Luke’s telekinetic energy for sale on the open market, and she knows that they are probably at the Pharos Institute. They head out, stopping for vinegar at a chip shop along the way.

The Slitheen try to harvest the energy but Luke escapes after overloading the system. He dodges the Slitheen and leaves just before Sarah Jane and the Jacksons arrive. The Slitheen take Maria hostage to disarm Alan, then explain how Mr. Smith contacted them with a promise of revenge. Sarah Jane determines that they are all being played by the Xylok to harness Luke’s powers.

Luke returns to Bannerman Road and is coerced into donning the headset. Mr. Smith channels the telekinetic energy to propel the Moon toward Earth in an effort to crack the planet and release the rest of the Xylok.

Sarah Jane strikes a bargain with the Slitheen by asking Alan to stop the supercomputer. She uses the Slitheen teleporter to return to the attic and confront Mr. Smith. He thanks her for helping him to execute his plan, showing mercy by returning Clyde. Sarah Jane distracts the Xylok long enough to release K9 from his black hole mission. K9 fires on the supercomputer while Sarah Jane uploads a virus that wipes Mr. Smith’s memory. The supercomputer shuts down and K9 returns to the safe.

The Bannerman Road Gang, now with a forgiven Chrissie, watch the Slitheen fly away. Mr. Smith reboots with a renewed purpose to safeguard the Earth while Sarah Jane reflects on her newfound family.


The first series of The Sarah Jane Adventures ends with style as this adventure touches on almost the entire lifespan of this family’s story so far. It also throws the audience a nice twist by revealing that a powerful ally has been scheming against our heroes this entire time.

The entire gang gets involved to not only save Luke, but to also save the world.


Rating: 5/5 – “Fantastic!”


UP NEXT – Sarah Jane Adventures: Series One Summary


The Timestamps Project is an adventure through the televised universe of Doctor Who, story by story, from the beginning of the franchise. For more reviews like this one, please visit the project’s page at Creative Criticality.


All That Glitters: The Skywalker Saga Commemorative Figures

All That Glitters: The Skywalker Saga Commemorative Figures


With the release of Star Wars: The Rise of Skywalker this December, the nine-episode Skywalker Saga is coming to a close. To celebrate that milestone, Hasbro announced a set of gold-painted 3.75″-scale action figures, released in two-packs (and one three-pack) to commemorate each film, and exclusive to Walmart stores at $14.99 for each pack.

The original trilogy is represented by Darth Vader and a stormtrooper, Han Solo and Princess Leia, and Luke Skywalker and Chewbacca. The prequels are represented by Yoda and Darth Maul, Mace Windu and Jango Fett, and Anakin Skywalker and Obi-Wan Kenobi. The sequel trilogy gets the expected players of Finn and Poe Dameron, Rey and Kylo Ren, and the trio of C-3PO, R2-D2, and BB-8.

It’s an admirable attempt by Hasbro, but it misses the mark because the figures aren’t particularly special. They’re just repaints of previous releases, many of which had been seen several times before and/or were exclusive to a single outlet.


Starting with the Prequel Era figures in the line—

The Skywalker Saga Darth Maul figure comes from the Target-exclusive Era of the Force 8-pack. That same Darth Maul was released three times prior: The Saga Legends Collection in 2014, The Epic Battles prequel pack from 2015’s The Force Awakens Collection, and another Target 8-pack from the Rogue One Collection in 2016.

The Skywalker Saga Jango Fett came from that same Rogue One Collection 8-pack, originating from the Epic Battles prequel pack from 2015 and the Saga Legends series in 2013. Meanwhile, The gold Mace Windu figure bridges the two as it comes from the Era of the Force 8-pack and the Epic Battles prequel pack, after first being produced for the 2013 Saga Legends series.

The gold Obi-Wan Kenobi was last seen in the Era of the Force 8-pack. That same figure was released several times, including in the Rogue One Collection 8-pack, the Epic Battles prequel pack, a Revenge of the Sith-themed two-pack in 2015’s The Force Awakens Collection, the 2014 Saga Legends series, and the 2013 Saga Legends series. The gold Anakin Skywalker shared the Epic Battles prequel pack with his former master, but only appeared in the 2013 Saga Legends series before that.

The Skywalker Saga Yoda figure is the outlier. It was originally the Jedi Master Yoda from 2017’s The Last Jedi Collection. That sculpt was reworked slightly for later release in the 2019 Galaxy of Adventures line.

All told, these Prequel Era figures have appeared multiple times before:

  • Era of the Force Target 8-pack (2017) – 3
  • The Last Jedi Collection (2017) – 1
  • Rogue One Target 8-pack (2016) – 3
  • The Force Awakens Epic Battles (2015) – 5
  • The Force Awakens Collection (2015) – 1
  • Saga Legends Collection (2014) – 2
  • Saga Legends Collection (2013) – 4


For the Original Trilogy Era figures—

The Skywalker Saga Stormtrooper is a repaint of the 2016 Rogue One series Stormtrooper, which was an all-new sculpt. Collecting site Jedi Business (whose extensive database was immensely helpful in the development of this work) speculated that it was a repaint of the Mimban Stormtrooper (minus the cape) from the 2018 Solo: A Star Wars Story line, but the Mimban helmet sculpt was different. It is possible that the gold Stormtrooper combines the two figures into one for this release.

Along those same lines, both the gold Darth Vader figure and the gold Princess Leia figure are repaints Solo: A Star Wars Story line. Both Darth Vader and Hoth Leia were original sculpts for 2018.

The Skywalker Saga Han Solo figure originally comes from the 2015 Saga Legends series, and was an original sculpt for that line. The gold Luke Skywalker was also an original sculpt for 2017’s The Last Jedi collection. Luke was included in a Target-exclusive three-pack with Emperor Palpatine and an Imperial guard.

The gold Chewbacca is one of the most recent re-releases, coming from the Galaxy of Adventures line in 2018. That figure was minor reworking of the Chewbacca from The Last Jedi, which was original to that line.

Counting up previous appearances, it’s a far smaller list for the Original Trilogy Era figures:

  • Galaxy of Adventures Collection (2018) – 1
  • Solo: A Star Wars Story Collection (2018) – 2
  • The Last Jedi Collection (2017) – 1
  • Rogue One Collection (2016) – 1
  • Saga Legends Collection (2015) – 1

It’s interesting that the majority of this set comes from late-2017 and 2018 releases given that Hasbro posted significant losses for that year.


For the Sequel Trilogy Era figures—

The Skywalker Saga Finn figure comes from 2017’s The Last Jedi collection. The C-3PO figure comes from the same line.

The gold BB-8 figure is a little more difficult to track down, but after looking at the antennas, it lines up best with 2015’s The Force Awakens Unkar’s Thug 3-pack (later re-released in the Target-exclusive 8-pack, the 2015 Kohl’s-exclusive 5-pack, and 2016’s Takodana Encounter 4-pack. I initially thought it was the BB-8 from The Last Jedi – found in the Rose/BB-8/BB-9e 3-pack, later re-released in the Solo: A Star Wars Story line – but that one has a more squarish tip on one of the antennas.

The gold Poe Dameron figure is a bit of a foggier story: It could come from either 2015’s The Force Awakens collection or The Last Jedi collection, both of which are virtually identical excepting paint jobs. The gold Rey also follows a murky trajectory: It could come from either The Last Jedi collection or and of the various reworks of that figure. Those include the Crait Defense 4-pack, 2017’s Praetorian Guard 2-pack, the Kohl’s-exclusive 4-pack, 2018’s Solo: A Star Wars Story series, and the 2019 Galaxy of Adventures line. It seems that every time the Last Jedi Rey gets released, it gets tweaked in some manner.

The Skywalker Saga Kylo Ren figure comes from either The Last Jedi or Solo: A Star Wars Movie. Similarly, the Skywalker Saga R2-D2 figure comes from either The Last Jedi or Galaxy of Adventures.  In both cases, the latter figure is a rework of the former, but they are virtually identical. The gold R2-D2 does not appear to come with the booster rockets from either of these prior releases.

Since the Sequel Trilogy Era figures primarily stem from either The Force Awakens or The Last Jedi, there’s no need to tabulate them like the previous eras.


It’s evident that there is nothing new nor remarkable about this action figure line. It is a figurative warming up of the leftovers with a new presentation.

I’m trying to avoid the cynical opinion that it would be better to pick up each figure on the secondary market along with a can of gold spray paint. It might be easier given Walmart’s track record with toy exclusives. But, I digress.

While priced lower than current 3.75″ Star Wars figures – a new figure runs nearly $13 today – it’s apparent that the target audience is adults. These are meant for mint-on-card display or for unboxing and standing on a shelf. I can’t imagine a kid choosing a gold version of their favorite character over a more true-to-screen painted option.

Since these are geared more for adult collectors, Hasbro missed a – ahem – golden opportunity to engage the Black Series line and produce a truly remarkable tribute to the movie saga’s milestone. Think about it in terms of who is missing in this set and what holes currently exist in the Black Series line.


How would I have constructed this tribute to make it more meaningful while saving some production costs for Hasbro?

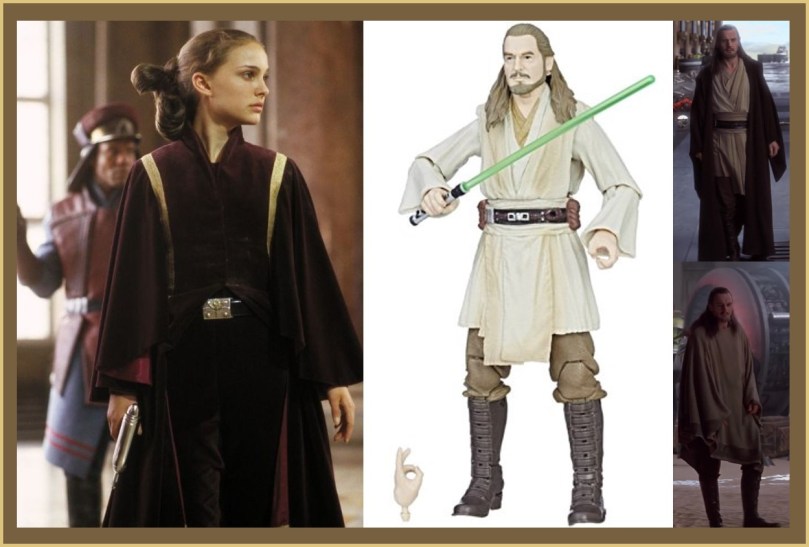
To start, where’s Padmé? For either The Phantom Menace or Attack of the Clones, I would have included her. As the mother of the Skywalker twins, it is a crime to not include her in this tribute to the Skywalker Saga. Additionally, she was at her best as an independent leader and fighter in the first two prequel films. Padmé has only been in the Black Series once and that was in her white bodysuit from the Geonosis scenes in Attack of the Clones. I would have considered including Padmé from the Battle of Naboo in The Phantom Menace.

To accompany Padmé, I would re-release the Black Series Qui-Gon Jinn from 2017, but I would include a soft-goods Jedi robe and poncho combination. Those elements would have been great additions to the original bare-bones release.

Moving to Attack of the Clones, Count Dooku is already rumored for a 2020 release, so just move that figure up in the pipeline. Yes, Darth Maul was far more flashy, but Count Dooku was more manipulative and engineered the Clone Wars. Plus, he was portrayed by the legendary Christopher Lee. To complete the pair, add in Yoda with a cleaner robe and reworked face from his first appearance in the Black Series line, lining him up with the climactic duel from the second prequel episode.

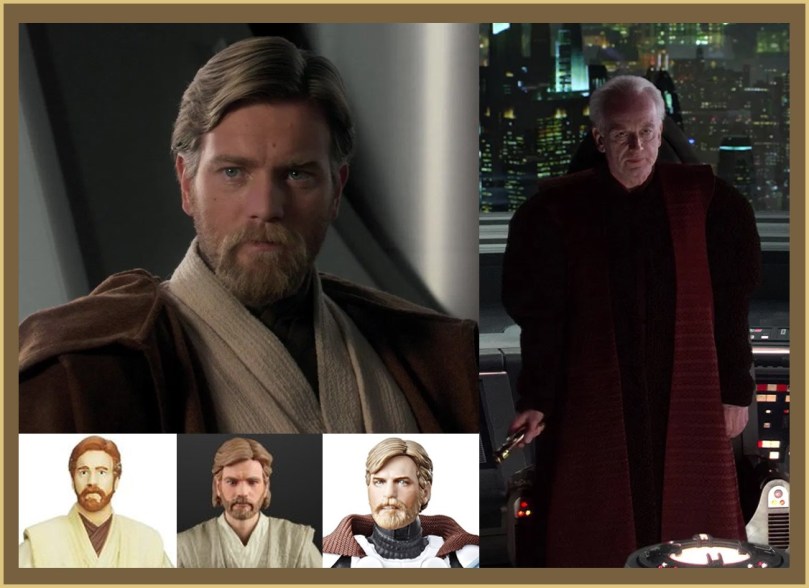
Revenge of the Sith is easy. Palpatine/Sidious has appeared twice in the Black Series line, both from Return of the Jedi. It would be great to see a figure from the moment when Palpatine reveals himself as a Sith Lord just before executing Order 66. To offset the new figure, add in Obi-Wan Kenobi from the same film. That particular character has been released twice in the Black Series, but it was the same figure each time. Not only did Hasbro neglect a soft-goods robe, but the face sculpt was terrible. Using the lessons learned with the recently released Clone Commander Kenobi and the upcoming Attack of the Clones Kenobi, Hasbro could easily correct the sculpt and offer a much better figure.

When looking at the Original Trilogy Era, things start getting tricky. Luke and Vader have been released several times, and both Han and Chewie aren’t as dynamic when it comes to wardrobe changes. This is where Hasbro has to get creative.

For A New Hope, I would use the 2017 Black Series Han Solo that included the optional black-gloved pilot hands. This time, I would also add the headset that he wears while piloting and fighting in the Millennium Falcon. I would also re-release the 2014 Chewbacca, but include a dejarik table if possible. This would be a large money-saving release for Hasbro so they could channel funds into new sculpts and remasters for this line.

The Empire Strikes Back contains one of my favorite costumes in the Star Wars films, so I’m a little biased here. The Black Series needs Bespin Leia, burgundy and white gown, in soft goods. No question. Back that up with a slightly different Darth Vader than we’ve seen before by tapping into the Dagobah cave trial. Using previous releases, Hasbro could remaster Vader slightly to align the costume to the film. Then create a damaged helmet with Luke’s face as an alternate head, making the figure serve two purposes as either Vader or Force-vision Vader.

For Return of the Jedi, I would start with the forthcoming Luke Skywalker Jedi Knight figure. It’s a great update to the previous release with the addition of a soft-goods robe, but I certainly have issues with it. Primarily, it needs darker hair and robes, a better face sculpt, and an extra lightsaber hilt to clip to the waist.

To cap the original trilogy era, Hasbro could make a special effort for this commemorative set and include the Sebastian Shaw version of Anakin from the pre-Special Edition versions of Return of the Jedi. It’s a deep cut, but a good one. That character has appeared as an action figure three times – 1985, 1998, and 1999 – all of which were in the 3.75″ scale.

A really bad version of the Hayden Christensen Force ghost debuted in 2007.

The sequel trilogy era is much more difficult in terms of originality.

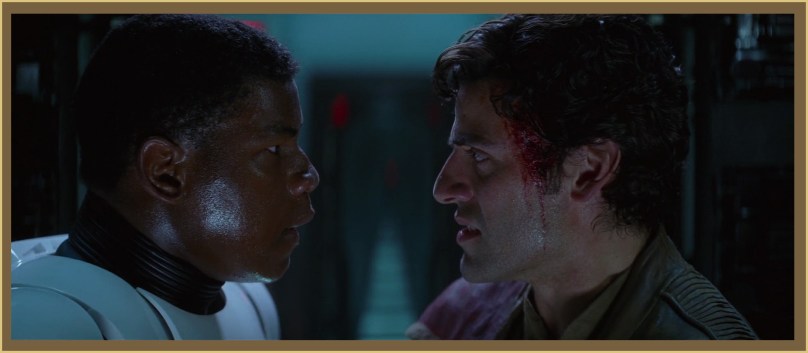
For The Force Awakens, I’d go with a remaster of Poe Dameron from the Escape from Destiny 2-pack. It captured his look from the opening sequences of the film, but it needs work on the face sculpt. For some reason, Hasbro can’t adequately capture Oscar Isaac’s features in plastic. I’d also add a re-release of Finn, either as FN-2187 or in Poe’s jacket from later in the film.

Still image from Star Wars: The Force Awakens.

For The Last Jedi, that has to be a re-release of the Walmart-exclusive throne room Kylo Ren (with removable helmet and soft-goods cape) alongside the Crait Base Rey. Rey’s soft-goods clothing would need to be cleaned up quite a bit for this release, so that’s where I’d spend most of the time in remastering this one. Plus, you know, this duo will certainly make the Reylo shippers happy.

Anyone who follows me on social media already knows of my disdain for that couple.

Still image from Star Wars: The Last Jedi.

Finally, since we don’t officially know that much about The Rise of Skywalker, I’d follow Hasbro’s lead here with the three droids: C-3PO, R2-D2, and BB-8. I would avoid the “red arm” variant on Threepio, and I’d also use a clean version of BB-8.

Still image from the 2016 Oscars.


In summary:

The Phantom Menace: Padmé (Battle of Naboo) and Qui-Gon Jinn

Attack of the Clones: Count Dooku and Yoda

Revenge of the Sith: Darth Sidious and Obi-Wan Kenobi

A New Hope: Han Solo and Chewbacca

The Empire Strikes Back: Darth Vader (Cave Vision) and Bespin Leia

Return of the Jedi: Spirit of Anakin Skywalker and Jedi Knight Luke Skywalker

The Force Awakens: Finn and Poe Dameron

The Last Jedi: Rey and Kylo Ren

The Rise of Skywalker: C-3PO, R2-D2, BB-8


This lineup covers the spectrum of the saga from the origins of the Skywalker line to the potential end as the nine-episode arc closes.

Honorable mention ideas include a Yavin Throne Room 4-pack with Leia, Luke, Han, and Chewie and something with the twins from the end of Revenge of the Sith. The latter would introduce the Organas and the Lars, each with swaddled infants as accessories, but the new sculpts would drive the cost. The Throne Room set would also be cost-prohibitive.

As far as cost is considered, Black Series figures typically sell for $19.99 each, though Walmart often prices them between $15 and $18 each. With that and the cost savings from reusing existing figures in mind, Walmart and Hasbro could easily move these sets for around $30 per box.

Again, since the gold figures are obviously geared for adult collectors, I built this hypothetical model toward adult collectors.


Thought exercise aside, the point here is simple: Hasbro took the easy way out with a milestone commemorative action figure set. After 42 years and nine films – not even counting the piles of books, comics, games, films, and animated series – a major player in pop culture is coming to a close. The fans deserve so much more than leftover and poorly-selling figures with bad paint jobs.

This was Hasbro’s moment to prove that they respect the franchise and the community, but they fell back into the same old routine that promotes maligned distribution practices and overpriced products. They could have offered Star Wars fans something amazing. Instead, all they did was prove Shakespeare’s The Merchant of Venice right.

All that glitters is not gold.


(Once again, collecting site Jedi Business and its extensive database was immensely helpful in the development of this work. I am grateful for the Jedi Business team and their hard work in cataloging and reviewing modern Star Wars figures.)

Timestamp #SJA5: Whatever Happened to Sarah Jane?

Sarah Jane Adventures: Whatever Happened to Sarah Jane?
(2 episodes, s01e05, 2007)


What would the world have been without Sarah Jane Smith.

Clyde introduces Luke to skateboarding, much to Sarah Jane’s chagrin. When Clyde tries and fails to ollie, Alan demonstrates the trick and then shows off his skills. The group takes some photos, prompting Sarah Jane to get the chills before they all head home.

Sarah Jane asks Mr. Smith about a meteorite that is heading straight for Earth, but she’s not worried since she can save the world without alerting a soul. Maria notes that without her the planet would be doomed, and Sarah Jane offers the young woman an alien puzzlebox. It came from a Verron Soothsayer with instructions to give it to the person she trusts the most and just to “remember.”

Maria heads home and works on the puzzle box while a cloaked figure stalks Bannerman Road. The mysterious figure gestures and everything about Sarah Jane disappears. The puzzle box glows blue and Maria jolts awake as if from a nightmare. The next morning, Alan shows off his old skateboard and talks about a woman named Andrea. Maria heads over to Sarah Jane’s house this Andrea in her friend’s place. Alan has no idea who Sarah Jane Smith is either, and she and Luke are missing from the photos from the previous day.

Maria calls Clyde, who doesn’t remember Sarah Jane either, and recalls that the meteorite is still headed for Earth. Maria bursts into 13 Bannerman Road and heads for the attic, but there’s no trace. Even Mr. Smith is gone.

Sarah Jane Smith has apparently been removed from existence along with the history of this entire show outside of Maria’s memory.

Even though Alan doesn’t believe her, Maria searches the internet for traces of Sarah Jane Smith. They eventually head to the library and discover that thirteen-year-old Sarah Jane Smith drowned in 1964 and Andrea Yates, the woman across the street, was her best friend. Maria faintly hears Sarah Jane’s voice as the names in the article flutter, but faced with the threat of being sent to the doctor for her delusions, Maria rolls with the new reality.

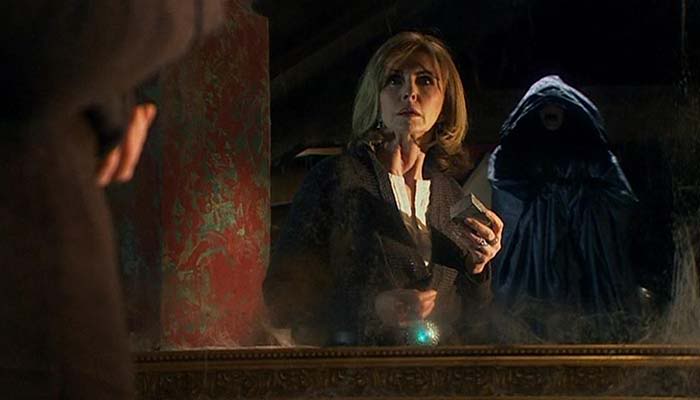
Maria apologizes to Andrea before reminding the woman of Sarah Jane Smith. Andrea doesn’t recall any of it until Maria presses the issue, but she then angrily pushes Maria out of the house. Andrea panics and rushes upstairs to find a puzzle box identical to Maria’s. She sees the cloaked figure in the mirror and is reminded of their agreement, and she begs to have Maria forget. The cloaked figure offers to make Maria disappear and Andrea agrees. All she has to do is separate Maria from Alan.

Meanwhile, Maria sees Sarah Jane in the mirror. As Andrea takes Alan to her house, Maria finds her puzzle cube and encounters a creature called the Graske that chases her out of the house. The Graske transmats Maria away and removes her from the timeline, but luckily Alan finds the puzzle cube and remembers her (even though Chrissie cannot).

Maria breaks free of the Graske and is deposited on a pier. The date is July 13, 1964, and Maria meets a young Sarah Jane Smith and Andrea Yates. Maria pleads with the girls not to go down the pier but they ignore her. The Graske arrives and transmats Maria back into captivity where she finds the adult Sarah Jane. They are the only occupants of a misty plane called Limbo.

The mysterious figure summons Sarah Jane and explains that he has removed her from the timeline in order to feed off the chaos that the meteorite will cause. This also removed the Bane, the Slitheen, the Gorgon, and Kudlak from recent history to perfectly craft his plan. He also plans to remove the Doctor in order to prevent any interference and sow an unlimited amount of chaos in the universe.

Alan, Chrissie, and Clyde attend Andrea’s party. Clyde gets word of the meteorite and turns on the news. That triggers Alan’s memory of Maria, and he pulls Andrea aside to get to the truth.

When Andrea and Sarah Jane were on a school trip in July 1964, they left to explore on their own. They went into the construction zone on the pier and Andrea tumbled over the side. Sarah Jane tried to save her friend, but Andrea wasn’t able to hold on. The mysterious figure told Andrea that she could switch places and she agreed, sealing Sarah Jane’s fate. The puzzle box was a gift to help her to forget on the condition that the mysterious figure would be with her forever.

Alan is disgusted, doubly so since Andrea made the deal twice. The mysterious figure offers to send Alan away so Andrea bats the original puzzle box away and the Graske shows up to give chase. Alan outwits the Graske with his skateboard and uses the snare device to rescue Maria.

As the meteor bears down on the planet, Andrea realizes that Sarah Jane can save the world. Maria and Alan run for the attic and find Andrea begging the mysterious figure for help. Andrea sees Sarah Jane in the mirror and Maria tells Andrea to break off the deal. Together, they appeal to Andrea’s humanity in an amazing scene between Elisabeth Sladen and Jane Asher.

Andrea faces the mysterious figure (which Alan calls “The Trickster”) and rescinds the offer. With a final farewell to Sarah Jane, the proper timeline is restored. Without a second to spare, Sarah Jane activates Mr. Smith and stops the meteor from hitting Earth.

Of course, all of it was in full view of Alan Jackson. And he demands an explanation.


What a fun trip! The alternate timeline constructed by this story is a fascinating thought experiment, one that apparently keeps all of Sarah Jane’s victories with the Doctor intact but credits them to this Trickster entity. The Trickster’s threat to remove the Doctor from existence echoes the Master’s plan in The Five Doctors, and his intentions to undo every victory in the Time Lord’s adventures are perfectly clear.

Regarding our characters, the Sarah Jane/Maria friendship continues to grow beautifully, and the introduction of Alan to the Bannerman Road Gang is hilarious and welcome.

There was a nice reference here to the Church of the Tin Vagabond, as well as a clever nod to the Black Guardian and Turlough in Mawdryn Undead: “Waking or sleeping, I am always with you.”


Rating: 5/5 – “Fantastic!”


UP NEXT – Sarah Jane Adventures: The Lost Boy


The Timestamps Project is an adventure through the televised universe of Doctor Who, story by story, from the beginning of the franchise. For more reviews like this one, please visit the project’s page at Creative Criticality.


No Laughing Matter

No Laughing Matter


Humor has a time and place. It’s an art, not a science, and can be therapeutic at times. It also needs to be done carefully.

Concerning jokes about mental illness and seeking therapy, especially so. Let me explain where I come from.

I have talked before, though never at any particular length, about the 2005 collision at sea on the USS Philadelphia. One of the immediate repercussions was losing some members of the crew who would no longer voluntarily go to sea. The event was just too traumatizing and they were sent home to be reassigned. Once we got underway again, those crewmen were the butt of many jokes (never by me, at any measure) for the following weeks. They were denigrated as not “real men” for being unable to tough it out and do their jobs. They were seen as weak for seeking mental self-care and removing themselves from a high-stress situation.

That incident is far from isolated in the military, and definitely not linked to one generation or decade in time. The history of each service is rife with people who have experienced trauma – shell shock, battle fatigue, soldier’s heart, PTSD, etc – but don’t seek therapy or assistance because they fear that it makes them appear weak in one way or another. It has ended relationships, careers, and lives in far too many cases.

It’s endemic in our society. Only recently have I noticed a trend of people openly talking about therapy and mental self-care. Before then – and still today – it was hush-hush for fear of retaliation by family, friends, and employers.

The peer pressure to avoid the appearance of weakness for seeking help is totally real. I’ve been down that road myself, and I know many more who walked it over the years.

I mean, it’s been fourteen years for me and I’m starting to come to terms with it. Imagine those around you – who you interact with on a daily basis – who carry that burden all the time.

It’s why I cringe when I see comments from people (especially friends) that use treatment as a punchline. From telling people who don’t agree with a particular stance that they need mental help to dismissing an opinion as a result of “not taking meds,” it’s a potential manifestation of that pressure. Even if it’s not intentional.

Sometimes humor inflicts damage. That damage can override the ability to “just get over it” or take a joke. It can even also be deadly.

All I’m asking is that people be more careful with their words and more mindful of their actions. Don’t treat mental illness or treatment of it as a targeted punchline to simply shut someone up. Treat the topic with the seriousness it deserves and find another way to make the point.

Creative Criticality Supports #TeamTrees

Creative Criticality Supports #TeamTrees


There is a movement occurring on YouTube, and this time it’s both constructive and potentially world-changing.

Back in May 2019, YouTube content creator MrBeast (known in meatspace as Jimmy Donaldson) reached 20 million subscribers on his channel that is dedicated to pranks, stunts, and general tomfoolery. To be completely honest, I had never heard of MrBeast before last weekend since I prefer more educational, sci-fi genre, and current events-type channels to (let’s say) the stylings of PewDiePie. But, upon reaching 20 million subscribers, MrBeast asked his audience what he should do to celebrate, and they made their desires perfectly clear.

They asked him to plant 20 million trees. One for each of his milestone subscribers.

MrBeast teamed with former NASA engineer Mark Rober to start a tree-planting campaign, which is where I heard about it. Over several months, they secretly recruited friends on YouTube to develop the plan, eventually opening it to everyone. Every creator has a community of friends and followers, and if they all donate even one dollar per tree, they can all plant 20 million trees together by 2020.


My family is deeply linked to the environment. We spend a lot of time enjoying the natural world all around us through hiking, river rafting, and scuba diving adventures. We do what we can to help keep it safe through local litter pick-up days, our neighborhood’s adopt-a-highway program, donating to conservation causes, and supporting organizations and legislators who share our ecological values.

Creative Criticality and my family are on board with this effort.


The donations go to the Arbor Day Foundation through the #TeamTrees portal. The mission team chose the Arbor Day Foundation due to the organization’s 47-year longevity and professional knowledge in the field. The trees will be planted in a variety of forests and public lands starting in January 2020 and the project is scheduled for completion by December 2022.

Planting 20 million trees won’t save the planet by itself, but it is a step in the right direction.


You can help by going to https://teamtrees.org/ and donating what you can. You can also help by asking your favorite content creators to join the effort by rallying their audiences with videos and posts like this. Even talking about #TeamTrees in social media feeds helps boost the signal. The more people who come to the cause means a greater chance of success.

Thank you for consideration.


Don’t just take my word for it. Here are some videos from my YouTube subscription feed that brought #TeamTrees to my attention.

Mark Rober investigated companies that are using drones to plant trees via biomimetics.


Derek Muller from Veritasium examined the science of tree heights.


Bob Clagett of I Like To Make Stuff gave his audience a quick tour of his farm.


Destin Sandlin from Smarter Every Day took a look at long-leaf pines and the role of fire in helping them to grow.


Joe Hanson from It’s Okay to Be Smart on PBS examined the physics of photosynthesis and how it would change on other planets.


Alan Melikdjanian, known as Captain Disillusion, devoted a couple of minutes to rallying his followers to the cause.


Once again, you can help by visiting the #TeamTrees donation portal, asking your favorite content creators to join the cause, and telling your friends about the quest to plant 20 million trees.